Showing posts with label paper piecing. Show all posts

Monday, 16 March 2015

Lil' Fox Cushion

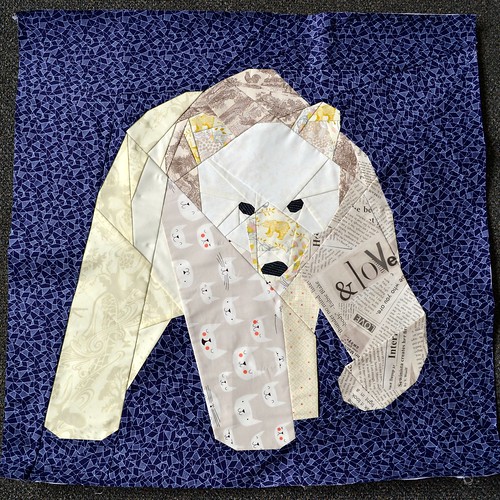
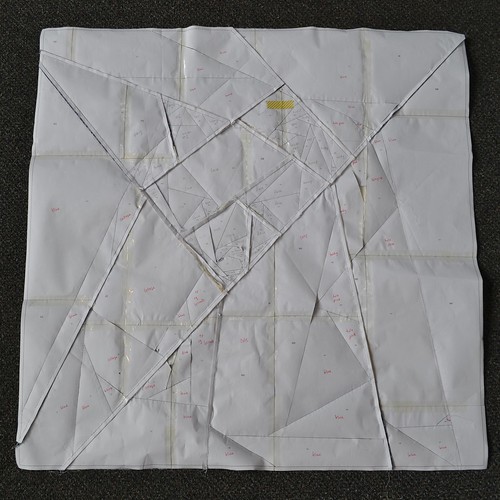
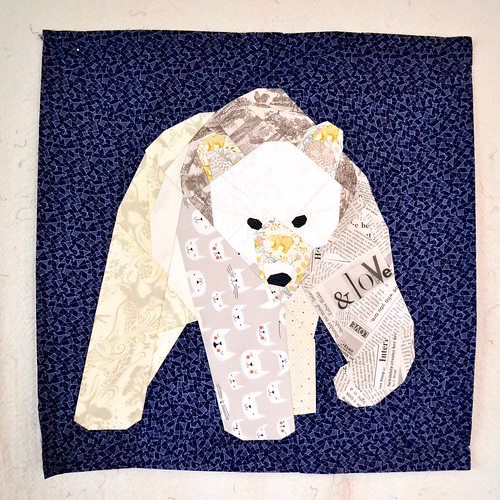
One of the classes I'm teaching this year at Stitchbird is on foundation paper piecing.  We will be using Artisania's Lil' Fox pattern and students can turn their paper pieced fox into whatever they like. All the class details are here.

Lil Fox Cushion

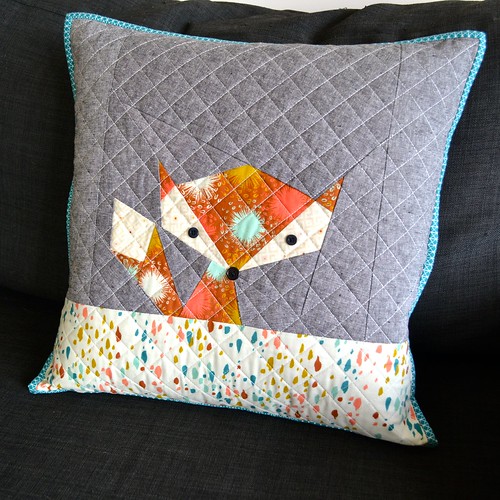
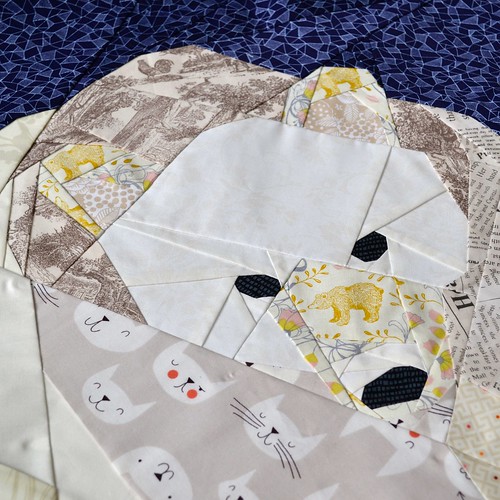
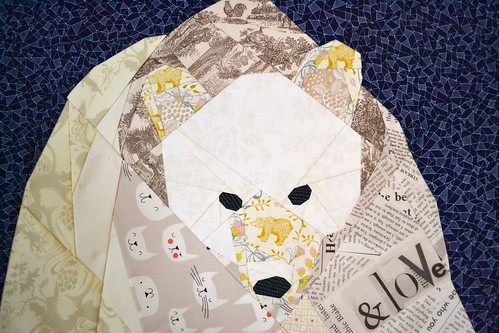
Of course, I had to make a class sample (as well as some step-outs to show in class).  I decided to use a few Cotton & Steel fabrics together with my old favourite, yarn dyed Essex Linen in Black (available here), for the sample.

Lil Fox Cushion

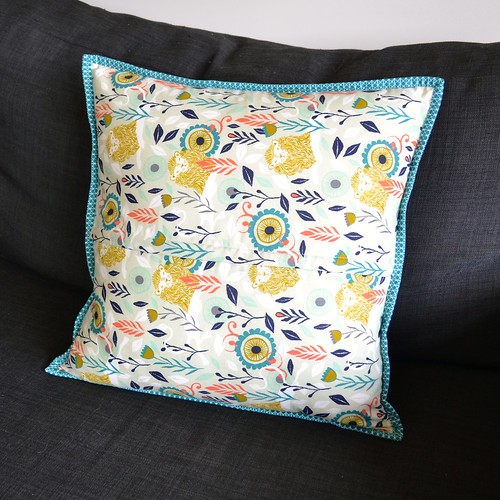
I also used Cotton & Steel for the back of the cushion, and using my covered zipper tutorial to finish.

Lil Fox Cushion

I thought simple would be better for the quilting, and went for a cross-hatch using a heavier weight thread again - I love the way the heavier thread stands out against the linen.  This one is Aurifil 2021 in 28 weight.

Lil Fox Cushion

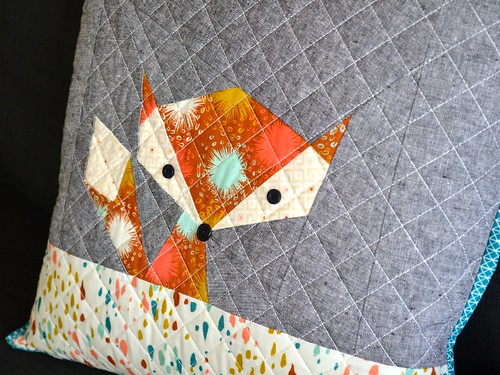
I'm not much good at embroidery so I stitched on some buttons for this the eyes and nose.  I think they give this guy some extra personality.

If you'd like to learn foundation paper piecing (and it is one of those things that is quite nice to learn from someone else), I hope you'll join me at Stitchbird.  Again, you can find all the class details here.

Follow on Bloglovin

Tuesday, 26 August 2014

Ursa Major aka the Big Bear (and a giveaway)

A couple of months ago I saw that Juliet from The Tartankiwi had designed an amazing big bear block.  I put my hand up to pattern test it because I thought it was just so cool!

This was the image I saw in Juliet's instagram feed!

I have to confess that when I opened up the pattern Juliet sent me, I wondered if I'd bitten off more than I could chew.  This block is 30" square and there are quite a few pieces to tape together.  I have some experience with paper piecing but I wouldn't call myself a paper piecing expert or anything.  However, once I decided to make a polar bear version, I got so excited about putting my block together that I got over my fears.

Ursa Major

After that, the whole process went super smoothly.  It took me one evening after work to cut out all my pattern pieces and tape them together, and then this Saturday I pieced the whole thing in one day.

Ursa Major

You can see from the back of my pattern that I made quite a few notes to myself to help with fabric placement!  It's definitely a must with something this size.  I also used a lot of Juliet's paper piecing tips and tricks and they really helped, particularly with some parts of the process I've found challenging in the past, like joining the pattern pieces.

Ursa Major 

I'm so glad I got through my nervousness about this block and actually stitched it up.  I am completely in love with the bear I made.  Using a lot of low volume fabrics for the bear presented quite a challenge in terms of getting enough contrast between the different parts of the bear's body - something I relished.  My fabric choices were not completely perfect but at the same time they resulted in some surprising and pleasing things (like the bear on his nose and the &love tattoo), so overall I'm happy.

Ursa Major

I was lucky enough to meet Juliet earlier this year when she was in Wellington for Handmade.  She is honestly the nicest person and I am just in awe of her talent for designing paper pieced blocks.  You absolutely must head over and check out Juliet's post which shows the block she made and the blocks all the other pattern testers made - without exception they are gorgeous and creative!

Juliet's Big Bear pattern is now available on Craftsy for the super bargain price of $2.95 for the first 48 hours (the price will then be increasing to $5.00 which I still think is a bargain for the massive amount of work Juliet has put into making this pattern awesome and easy to use).

Ursa Major

Juliet is very kindly letting me give away a pdf copy of her Big Bear pattern, together with a pdf copy of one of her other patterns.  To enter, just leave a comment here letting me know which other pattern of Juliet's you'd like to win - you can check out her Craftsy store here.  If you win and you've already bought the Big Bear pattern, Juliet will either refund you, or give you another pattern of your choice - whichever you prefer.

The giveaway will close at 8:30 p.m. New Zealand time on Sunday 31 August 2014, and I'll pick a winner using the random number generator.  This giveaway is open internationally, but if I can't contact you, you can't win.  Please make sure to leave your email in the comment if you think you might be a no-reply blogger (and check out my tutorial here if you're not sure).

Thank you, Juliet, for letting me be a pattern tester for this block.  It pushed me to do something that I wasn't completely sure I could manage, and I love the result.  I think the most satisfying quilts come from the times you push your limits and succeed anyway!

Follow on Bloglovin

Full disclosure: the links in this post are affiliate links.  This means that if you're not already a Craftsy member and you sign up after clicking through from this post, I'll earn a small commission.  I've been a Craftsy affiliate for ages because I think their classes are great and I love the way they facilitate indie designers like Juliet.

Wednesday, 13 November 2013

WIP Wednesday

A quick WIP Wednesday today, because although I have lots of WIPs on the go, they mostly aren't at interesting stages.  First up is this block I made a couple of weeks ago for Tracey in the Simply Solids bee.  It's made using the Star pattern from Faith at Fresh Lemon Quilts' Summer Sampler Series.

Star Block for Simply Solids bee 

I'm particularly pleased with the hot colours in this block - they really make it for me.

The next block is part of my newest WIP, one that I am very excited about.  My local guild, Capital Quilters, is holding an exhibition of members' quilts next year.  Each time there is an exhibition, a raffle is held, with a quilt as the main prize.  I am on the exhibition committee and am making the raffle quilt (although it will get sent out for long arm quilting - phew!).

Acacia Stars - block 1

This is block number one of thirty for the raffle quilt.  I am using a bundle of Tula Pink's Acacia collection with co-ordinating solids from Westwood Acres (you can also find Acacia at Stitchbird and Fat Quarter Shop).

The pattern is super simple and based on a Kaffe Fasset design - just eight pointed stars like this with a border.  I won't be fussy cutting for every block, but I just could not resist featuring the raccoon in this way - isn't he soooo cute?!  I am rather concerned that I won't be able to let this quilt go when it's done...  Also, between this quilt and a couple of others, I have a lot of HSTs to trim, so I bought a couple of Bloc Loc rulers to help.  I haven't done much trimming with them yet, and will do more of a review when I have, but so far I like.

Have you found any new gadgets lately?  I'm not hugely into gadgets, but I'm definitely willing to invest in things that will make the quilting experience better.  A good example is the little wee rotary cutter with a 28mm blade that I bought recently.  I never thought I would need more than one size of rotary cutter, but it is great for all that HST trimming - I feel like the smaller blade gives me much more control.  I'd love to know what makes your quilting experience better.

Linking up with Lee at Freshly Pieced:

WIP Wednesday at Freshly Pieced

Follow on Bloglovin

Wednesday, 19 June 2013

WIP Wednesday

I've been working away on my Sailboats quilt.  A couple of weeks ago my friend Helen (yes, the one with that cushion) gave me some pointers on machine appliqué and let me use her (rather lovely) Janome Horizon to appliqué the stars onto their background squares.

This was a deviation from the pattern - it instructed reverse needle turn appliqué, where you needle turn appliqué the lighter background pieces to the star fabric.  That method would make sense if, for example, the stars were light and the background was dark, but for this pattern it seemed like an unnecessarily large amount of work, so I went with machine appliqué instead.

Sailboats quilt in progress 

I then stitched the star borders together and added them to the central panel and the first border.  After that I created the third and fourth borders using lots of little pieces of the blue and red fabrics I used for the boats and the stars.

Sailboats quilt top finished 

Above is my finished quilt top, and below is the quilt top from the book (Le Petit Monde de Jacqueline Morel).  

You can see that I changed the colour scheme up a bit - I think mine is a bit crisper and more modern, while the original has a softer, vintage feel to it.  I also changed the placement of the boats, mainly because I liked the look of some more than others (and to be honest, I thought the little one in the centre of my quilt would be the most difficult to make and therefore I only wanted to make it once!).

Old Sailboats Quilt from Le Petit Monde de Jacqueline Morel

You might also have noticed that my boats are reversed from the ones in the original quilt.  This is because the pattern instructs you to use templates to make the boat blocks.  I'm sorry, but no way was I going to do that - it would have been a disaster for me.  Instead, I copied the boat blocks from the book, and used the copies as foundation papers to make the boat blocks.  This was far more accurate (and therefore satisfying) for me.

I now have the quilt top basted and am planning to quilt it this week or this weekend.  I have a question for my readers though - something which has been bothering me for a while.  I will be giving this quilt at a baby shower, and I would really like to put a label on it, but I don't know what to say.  My friend is having a baby boy, but he doesn't have a name yet (as far as I know - and it's not really the done thing here to name your baby before birth).  I'm sure this is something many of you have encountered before, so I would love to know - what do you do in this situation?

Linking up with Lee at Freshly Pieced, and Kirsty at Quiet Play:

WIP Wednesday at Freshly Pieced Paper Piecing Party


P.S. You might want to check back tomorrow for a giveaway I have planned.  Only if you like fabric though! Updated - giveaway here.

Wednesday, 5 June 2013

WIP Wednesday

This week, I'm working away on my sailboat quilt.  I've finished all the boats so the next step is to assemble the centre panel and then add the first border.  Once the quilt top is finished, I'll post a picture of the quilt in Jacqueline Morel's book (Le Petit Monde de Jacqueline Morel) so you can see how I've changed it up a bit.

Sailboat quilt in progress

I'm also going to try and get my June block for the Simply Solids Bee done this week - it is a double nine patch.  The first quilt I ever made was a nine patch quilt, so it is a favourite block of mine!

What are you up to this week?

Linking up with Lee at Freshly Pieced:

WIP Wednesday at Freshly Pieced

Monday, 3 June 2013

Starting a sailboat quilt

Did you know that Beth from Plum and June is hosting another New Blogger Blog Hop?  I'm a participating blog hopper and I can't wait to meet all the others.  The schedule should be finalised very soon, so make sure you check back and follow along.  I know I found lots of great blogs to follow during the last blog hop!

Plum and June

This weekend (and by the way, it's a long weekend here in New Zealand - yay!), I've been working on a quilt for my good friend who is expecting a baby boy (her first) in August. I've had a sneak peek at the decor she has chosen for the nursery, and I decided to make a quilt to fit with the nautical theme.

Old Sailboat Quilt 

I'm using a pattern from the book Le Petit Monde de Jacqueline Morel.  Jacqueline Morel's quilts are a little bit more traditional than my usual style (particularly the fabrics she uses), but the patterns themselves are very charming.

Old Sailboat Quilt

Once I've finished the paper pieced boats in the centre of the quilt, there are blue and red stars to appliqué on the squares in the second border, and a final border before it is finished.  My lovely friend Helen has offered to give me a lesson in machine appliqué next weekend, so I should be able to get the stars done then. I'll keep you updated on progress with this quilt!

Linking up with:

Plum and JuneBetter Off Thread

Tuesday, 30 April 2013

Paper Petals Quilt

I am so pleased to finally be able to share this quilt with you!

Paper Petals Quilt

It is featured in Issue 13 of Fat Quarterly, out now!

Paper Petals Quilt - back

I designed this quilt back in December 2012, and made it up over January and February this year.

Paper Petals Quilt

I really enjoyed using the Noteworthy collection, by Sweetwater, for Moda, to make this quilt.  It was really hard not to share progress pictures and the finished quilt once I was done.

Paper Petals Quilt - binding

Apart from the back and the borders, this whole 90" square quilt was paper pieced.  No way could I have done this quilting - it was done by the talented Sue Burnett.

Paper Petals Quilt - close up

So, if you are interested in making your own version of this quilt, check out Issue 13 of Fat Quarterly - and do let me know, I'd love to see it made up in different fabrics!


Quilt Stats
Pattern: my Paper Petals pattern, available in Issue 13 of Fat Quarterly
Finished size: 90" square
Fabric: Noteworthy by Sweetwater for Moda, Moda Bella Snow
Backing: Text print and floral print from Noteworthy by Sweetwater for Moda, both in Cloudy
Binding: Assorted green prints from Noteworthy by Sweetwater for Moda
Pieced by: me
Quilted by: Sue Burnett on her long-arm machine.

Linking up with Finish it up Friday at crazy mom quilts.

Wednesday, 26 December 2012

Handmade Christmas Revealed - Day 1

Merry Christmas - I hope everyone had a great day and you are now enjoying your Boxing Day traditions.

First up on my Christmas reveal list is my Feeling Festive table runner, which I gave to my grandmother.  I finally made a decision about the binding and got it stitched on this week.


Thanks for everyone's suggestions about which fabric to use for the binding.  I really like the idea of a frosty binding, but in the end I went for a darker fabric to frame the runner and pick up the darker teal colour in the backing fabric.


I am very pleased with how this little project turned out, and I think I will try and start my Christmas sewing a little earlier next year so that I can get more done.


Finally, I wanted to show one of the techniques taught in Angela Walters' Free Motion Quilting class on Craftsy - combining FMQ designs.  I just combined the swirls and pebbles at each end of the quilt, where I needed to transition from the "sky" to the "ground".

Have you tried any new quilting designs lately?

Tuesday, 11 December 2012

Paper trees - tutorial

Thanks to everyone who expressed an interest in a pattern or tutorial for the Christmas trees in my Feeling Festive table runner (finished project here).

This one!

I have put together a very simple tutorial, which will work great for anyone who has done paper piecing before.  If you are new to paper piecing,  Faith from Fresh Lemons has a great tutorial here, which is for a different pattern, but has great pictures and really clear instructions which should get you started.

Here is a diagram showing the dimensions for the tree blocks.  I just drew nine of the tree blocks out onto freezer paper, four in a row to speed things up.  I then cut each tree block out so that I had nine individual units.


I then cut each tree block into two pieces along the dotted red line, so I was left with the triangle piece and the trunk piece.


Then, I paper pieced the tree blocks in the order shown below.  A couple of tips.  The first (and crucially important one) - I don't include seam allowances on my paper piecing templates (I find it easier that way) but make sure you leave a quarter inch seam allowance around the outside of each piece of the tree block.  The second - make sure you reduce your stitch length, and backstitch at the end of each line - this will help a lot with removing the paper when you're done.

Once you have made the two pieces of each tree block, stitch them together using a quarter inch seam.

My preference is to leave the paper on the blocks until I have stitched them together, and sashed them out.  This is because there are inevitably bias edges which can be stretched and warped if you have to pull on them before they're secured.

I hope this tutorial is useful - please feel free to let me know if you have any questions in the comments.

P.S. - don't miss out on my giveaway as part of Quilting Gallery's Blog Hop Party - all you need to do is leave a comment on my giveaway post.

Follow on Bloglovin