Tuesday 31 January 2017

A Quilter's Pantry Block for the Honey Pot Bee

Welcome Honey Pot Bee members! I'm excited to be one of your queens for the month of January. Big thanks to Molli Sparkles for organising a fab bee - make sure you check out all the posts here.

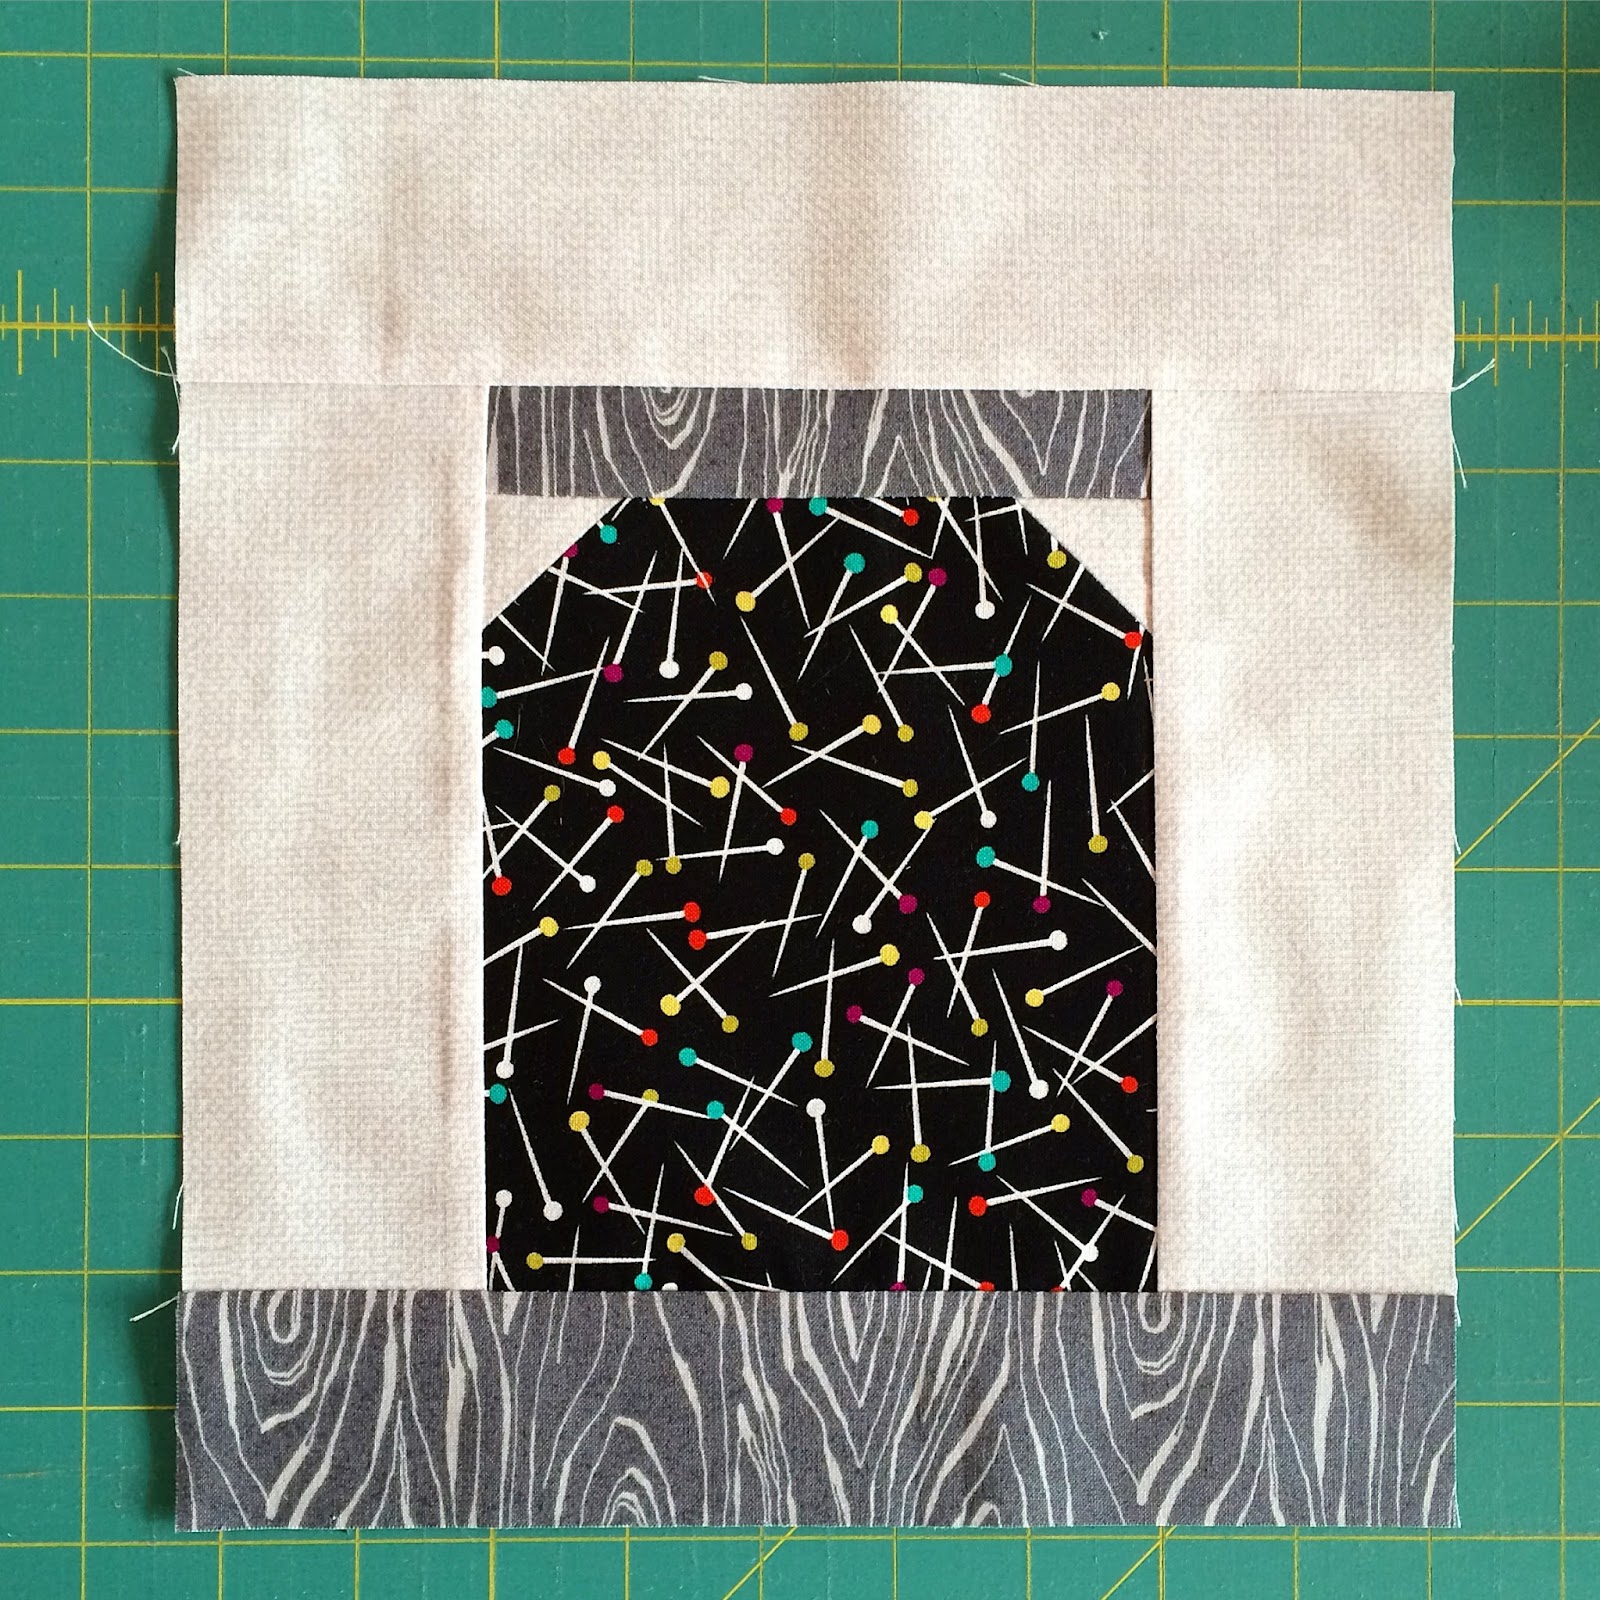
Put those novelty fabrics to use to make jars of yummy treats, sewing notions, or surprises that you would only find in a quilter’s pantry!


IMG_8442.JPG


Fabric

For this block, you need:
- a fun novelty print to make your jar
- a light solid or tone on tone fabric for the background
- a dark solid or tone on tone fabric for the lid and the shelf


Cutting instructions
Novelty print: 
1 x 5 ½” by 6 ½” rectangle
Background fabric: 
2 x 1 ½” squares of background fabric
2 x 7 ¼” by 2 ½” strips of background fabric
1 x 2 ½” by 9 ½” strip of background fabric
Dark fabric:
1 x 5 ½” by 1 ¼” strip of dark fabric for the lid
1 x 2” by 9 ½” strip of dark fabric for the shelf


Assembly


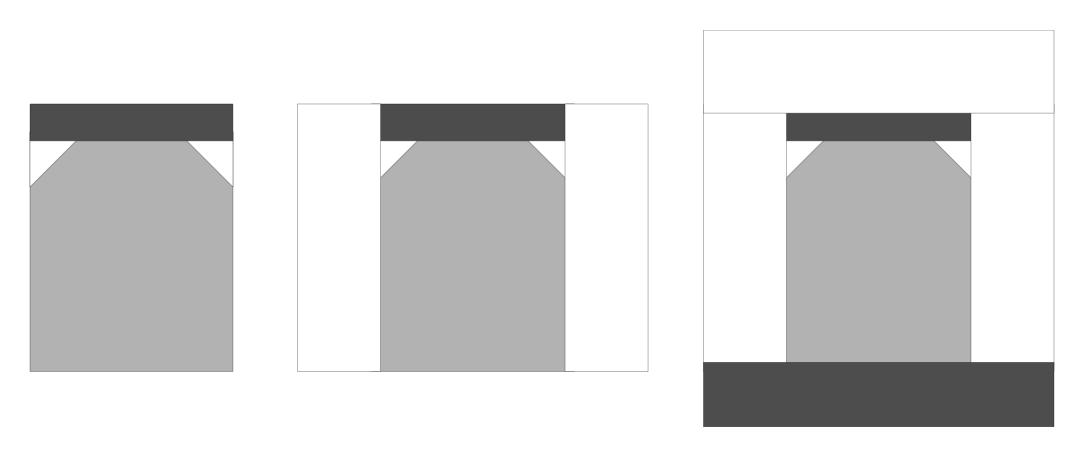
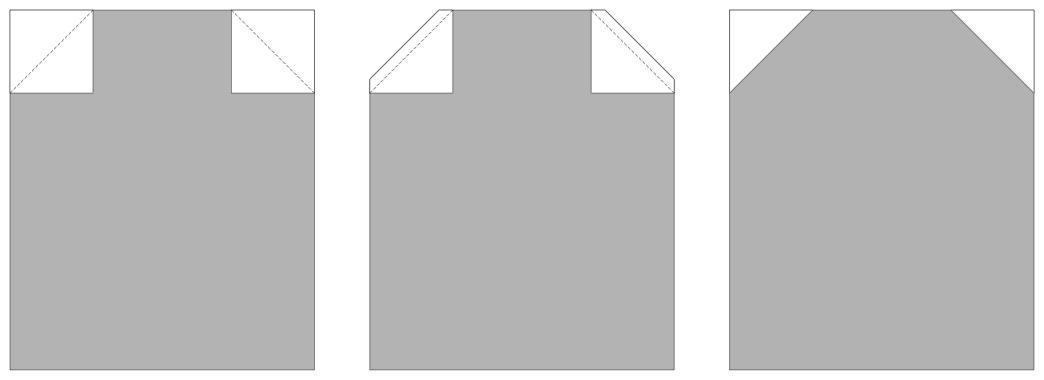
Draw a line on the WRONG SIDE of the 1 ½ ” squares of background fabric.  Place the squares right sides together with two top corners of the novelty fabric rectangle and stitch on the line.  Trim away the excess fabric ¼” away from your stitching line and press the corners out.


quilter's pantry diagram 1.png

Add the 5 ½” by 1 ¼” strip of dark grey fabric to the top of the block, and press.  Add a 7 ¼” by 2 ½” strip of background fabric to each side and press.  Add a 2 ½” by 9 ½” strip of background fabric to the top, and a 2” by 9 ½” strip of dark grey to the bottom.  Press for the final time.  The block should finish at 9 ½” by 10 ¾”.


quilter's pantry diagram 2.png

Saturday 28 January 2017

Arohanui Quilts

Hello lovely readers! Many of you will be familiar with the Soy Amado Quilts project that Alison from Little Island Quilting has been running since 2014 (she's up to over 100 quilts made and donated to kids in Mexico and South Africa). At the end of last year I quilted up a bunch of blocks from one of my earliest quilt projects and sent them off to Alison.

Some of the blocks I sent to Alison

I decided that I want to do some good locally as well. I run the block of the month programme for my local guild, Capital Quilters, and for the first two months of 2017, instead of the usual format, I'm asking members to make QAYG blocks and donate them so that I can assemble them into quilts for Kiwi kids. I am planning to donate the completed quilts through the Aotearoa Quilters Cosy Kiwi Kids programme - at the moment they are providing quilts to families with children in Kaikoura and earthquake affected areas.

I thought that some other Kiwi quilters might like to contribute blocks as well - they're really fun to make, you can use up batting scraps, and you'll feel good! It's also a heck of a lot cheaper to send blocks within New Zealand than from New Zealand to Guernsey!


At the moment I'm looking to have all blocks with me by the end of March 2017, so that I can assemble all the quilts and send them off before winter. I'll let you know if I change my mind and decide to run an ongoing project like Alison though.


If you would like to contribute, you can download my instructions by clicking here. Send me an email or a direct message on Instagram, and I'll send you my address for posting. If you want to share your blocks on Instagram, use the tag #arohanuiquilts and I'll be able to track them down.

Finally, if you don't have time in the first two months of the year, or you're in a location that makes sending blocks to New Zealand prohibitively expensive, please consider contributing QAYG blocks to Alison's Soy Amado Quilts project. You can find all the information here.

Thank you!

Monday 16 January 2017

Leadlights

Just popping this image up here so I can link to the mosaic contest that Rachel at Stitched In Color is hosting at the moment (here).


It's very hard for me to resist choosing fabrics, even if I'm only doing so virtually! These ones are from The Loopy Ewe.  Coincidentally, there is a fabric shop near Wellington called the Krazy Cow - the people who named these two shops must have been on the same wavelength!

Tuesday 10 January 2017

Block Pattern - Spring Chickens

For the last 18 months or so, I've been designing the block of the month for my local guild, Capital Quilters.  I keep thinking that I really should share the block patterns here, but have never gotten around to it.  To be fair, I haven't gotten around to much blogging at all lately.  Anyway, here we are!  I'm starting off with Spring Chickens, which is the most recent block I designed.  Of course, you can change up the colours to suit yourself, but I have left my original colour instructions for the guild.

Here is the link to download a pdf with the chicken templates.  Please note, when printing, you must use the "Actual Size" or 100% scale setting, NOT the "Fit" setting.

I really love the idea of my own free range flock of chickens, and fresh eggs every day. My current house isn’t really suitable though, so for the meantime, these gals will have to do. The point here is to choose fabrics that in no way resemble the actual colouring of a chicken - a medium to large scale multi coloured print for the body, with more intense brights for the wing and comb and dark for the legs so that they stand out from the background. For the background, choose a blue-grey fabric, something a little on the dull side, and with enough contrast to your chook body that you see the outline clearly.

FullSizeRender.jpg

Fabric and cutting 
For this block, you need:
 - a 9 ½” square of a light or medium fabric that reads blue-grey
 - multicoloured light or bright scrap for chook body
 - small bright scraps for wing and comb - this will be more effective if the fabric reads as a single colour
 - small dark scraps for legs - this will be more effective if the fabric reads as a single colour
 - fusible webbing (steam-a-seam, vliesofix, softfuse, etc)

Preparation

Trace the chook body, wing, comb and two leg pieces onto the back side of your fusible webbing. Cut out, leaving some extra room around the shapes. Fuse the fusible webbing onto the WRONG SIDE of your chosen fabrics. Carefully cut out the chicken shapes on the line you have traced. 

Assembly
Cut a 9 ½” square from your blue-grey background fabric. Lay the pieces out on your background square. Make sure there is at least ¾” between the lowest part of the feet and the edge of the background fabric. The chicken body should cover the top of the legs and the bottom edge of the comb, so that you only need to sew around the uncovered edges. Once you are happy with the position of all the shapes, fuse in place.

IMG_5772.JPGIMG_5773.JPGIMG_5774.JPG

Using your sewing machine, blanket stitch or zigzag stitch around the chicken shapes to secure them to the background fabric. Use a thread to match your applique shapes (you might have to change colour for the different elements), or an invisible thread.

 The block should finish at 9 ½” square.

If you follow me on instagram (@adrianneonthewindyside), you will see that I have started my own quilt with blocks that are similar to these, but set on point.  So far all my chickens are assembled but yet to be stitched down.