Thursday 31 July 2014

Thursday Inspiration: Cille from Live, love, quilt...

This week Cille from Live, love, quilt... is joining me for Thursday Inspiration.  Cille is a lovely modern quilter who lives in Denmark.  I really enjoy the time Cille takes to explain her process and show photos of her quilts in progress.

Here is Cille with her husband and one of her boys.

I also enjoy the way Cille's love for her family manages to sneak its way into many of her blog posts. Her sons are clearly big fans of quilts and are often roped in for quilt holding duties (fair enough, I think!).

Does your family have a quilting or sewing history, or are you a first generation quilter?
I'm the first one to quilt in my family but I guess we have a strong craft gene running in our DNA. My mother and grandmother were weavers, my grandmother and great grandmother made amazing embroidery too, and my mum and sister also knit amazingly. I thought I skipped the gene until I was twenty-something and suddenly started embroidering. I was the one who got my mother to quilt too by proposing to make an EPP quilt together (we live quite far apart - she's in Sweden). Now she loves quilting too.

How did you start quilting, and how long have you been quilting for?
I'm not sure why I started honestly. I remember I saw a quilt in a magazine about 15 years ago and thought that I should be able to make that myself (never having made a stitch in my life before, mind you. Craziness is also a strong gene in my family). I did make the quilt but then I had my children and stopped quilting while they were little. It picked up again about 4 years ago. Now I can't live without it. I'd rather miss sleep than quilting.

This Peekaboo Street quilt is so cute!

How would you describe your quilting style?
Tough question... I'm not sure I have a specific style. I like classical elements but sometimes best in a modern setting. I'm not a true modern quilter by any means though. Being an online addict also means my style is very different from the common Danish style, which tends to be very inspired by Kaffe Fasset fabrics and quite traditional. Getting fabric sent to Denmark is a very costly affair (on top of the shipping cost, we have to add 25% and a handling fee at close to $40). I tend to take home large bulks a few times a year because the selection locally is very limited. Hence my style and fabric selections automatically become more international.

Where do you find inspiration for your quilts?
Online reading blogs and in books mostly. I buy a lot of books and patterns. I rarely follow the patterns, but if I feel inspired by them and decide to do something similar, I know there's someone at the other end who has worked hard to make the pattern, so I acknowledge it by buying it.

Do you like to follow patterns or create your own designs (or a bit of both)?
I'm horrible at following patterns. I see something that I like, and then I do something different. I have promised myself that one day I will buy a pattern, buy fabric in measurement and make a quilt following the instructions. But chances that that will ever happen are limited though... I think what I love most about quilting is when your quilt suddenly takes you in another direction than what you had planned. Those kind of quilts always turn out best.

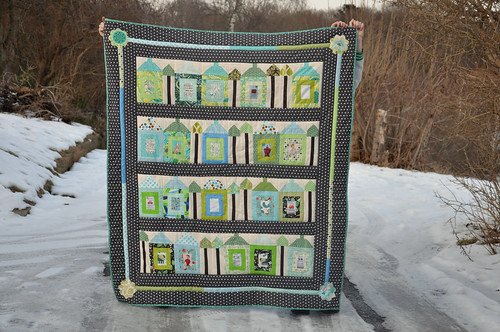
Lovely Longjohn quilt.

Are you a member of a local guild?
Not really a quilt, but I do follow a course (that you have to be invited into basically). The same group of people have been following the course since 1986 and they are still in the class. There's rarely an open seat because the places are reserved. Most in the group are (needless to say) fantastic quilters and I learn a lot from them. My style is very different though so they tend to look at me as 'the young and crazy one'. Luckily they have a lot of patience with me.

Have you ever met any of your online sewing friends in real life?
No, but I'd love to. If I'm anytime in Ohio, I know just where I would invite myself for a cup of tea. I can't imagine I'd be bored in Australia either...

How did you decide to start your blog?
It was basically a log of my quilts - just to remember them. Still is mostly. I think I have the smallest blog in the blogging universe, but I still enjoy it.

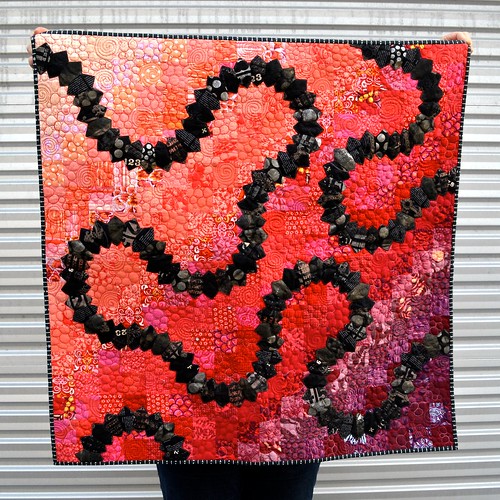
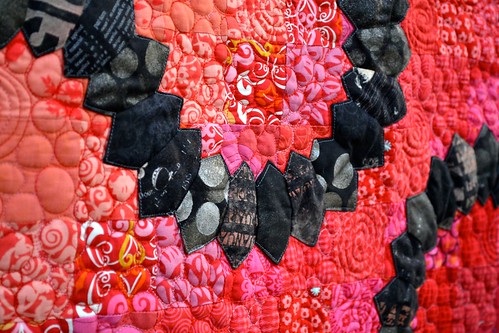
This is such an effective quilt - can you believe its all made of scraps?!

Do people in your personal and professional life know about your quilting and blogging or do you keep it under wraps?
Professionally I keep it under wraps but in my personal life everybody knows... Heck, most of them have one of my quilts. Not very many people know about my blog though.

Is quilting popular in Denmark?
It is becoming more and more popular, but not to the same extent as in the US for example. We don't have a strong quilting tradition in Denmark, but crafting is becoming more popular in general.

What is your favourite thing about the online quilting community? And what is one thing that you would change, if you could?
Oh where to begin... Basically I wouldn't have been quilting if it wasn't for the online community. I used so many tutorials in the beginning. If someone hadn't taken the time to show how to make a Dresden or a bind a quilt, quilting for example, quilting would have been an up-hill experience for me. So basically I owe all to the online community. I like how people are generally positive - it's like there is a common consensus that if we don't have anything nice to say, we just don't say anything.

Change it? I'm not sure I would even if I could. We move along the new media, but essentially the atmosphere is the same. I like that. I'm an very honest person and I sometimes show very bad projects online because it doesn't have to be perfect every time. My quilts certainly are not all pretty and perfect. It takes quite a safe environment to do so.

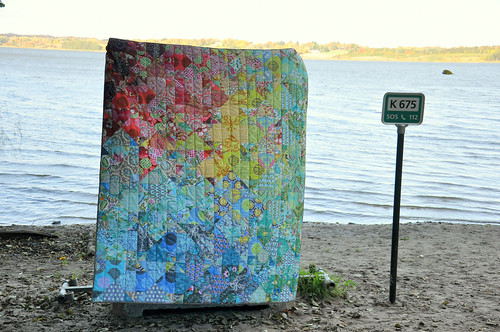
Cille's gorgeous take on the Roundhouse quilt

Confession time - how many quilts do you have in your house right now?
9 and counting. Basically my sons refuse to use duvets anymore - it takes quite a few quilts to keep that show going. A lot of quilts are also great for when we make a bonfires etc - our guests love to pick a quilt from the big basket I keep in the living room. But that being said, I've given most of my quilts away.

Do you do any crafts other than quilting?
Nope, but I used to do embroidery and also had a brief fling with wicker work making baskets. I'd love to take that on again sometime in the future but it takes time and planning. Not something I have a lot of these days.

Where do you see your quilting going - is it a career or a hobby for you and would you like to change that?
Definitely a hobby :) My full time job is quite demanding and I make way more money doing that that I ever would quilting. However, even all the money in the world can't beat a homemade gift. I make quilts for the people I love and treasure. The rest I buy a present for ;)

Love this quilt, especially because Cille designed it herself.

Do you have any tips or tricks or things that have changed your quilting life that you'd like to share?
I'm not an expert by any mean, but I do sort my fabrics very neatly in IKEA CD shelves - not only by main color groups but also in shades of a specific color. It makes it easy to pull a project directly from the shelf and to match up different fabric lines.

What is your favourite part of the quilting process (and what's your least favourite part)?
The actual quilting is the worst. I stink at it I think and fear it every single time. I love doing bindings though - always have. Are there any quilting techniques you haven't tried yet but that you'd like to? I'd love to be able to make FMQ – I’ve practiced a few times but haven't dared to take on a quilt yet. Also I need to make a Lone Star some day...

Thank you so much to Cille for answering all my questions.  Hop over to Live, love, quilt... to check out Cille's other quilt and her most recent make which is just stunning.

Follow on Bloglovin

Monday 28 July 2014

Block a Day July - Week 4

Oh no - I nearly forgot to post my fourth week of blocks! Oops! Anyway, here are all 27 of my blocks so far - I almost can't believe there are only 4 more to make! 

Untitled

This week's blocks, all in the bottom row: 21 July - Forecast of overnight snow, 22 July - Time for an early night, 23 July - Anyone for a cuppa?, 24 July - Star flower, 25 July - Croque-madame, 26 July - Lazy Saturday, 27 July - Scrappy log cabin.

My quilt is continuing to be pretty eclectic and scrappy, which I'm loving.  Here is the link-up for everyone who who still playing along!


Follow on Bloglovin

Saturday 26 July 2014

Caturday Wisdom #78

You may encounter large obstacles in your life, but occasionally you'll find something...
 
 ...that Ralph's large obstacle of a butt can't fit on. Ivy

To be fair, Ralph is also too scared to even try to get onto this little shelf as it's over the fireplace we have been using A LOT this past freezing week. The heated-floor effect of the fireplace is what makes it so desirable but really I think Ralph's inability to kick her off makes that smug little cat smile you see above.

Thursday 24 July 2014

Thursday Inspiration: Megan from Jaffa Quilts

Today I'm thrilled to welcome a fellow Kiwi quilter as my Thursday Inspiration interviewee.  Megan from Jaffa Quilts makes awesome modern quilts and I've loved watching her journey as a quilter.


Megan and I yet to meet in person, but we are planning a catch up some time when we're both in the same city.  In the meantime I'll keep enjoying her blog and her lovely quilts from a distance.  Here's Megan - as always, my questions are in bold and her answers are in normal text.

Kahurangi

Does your family have a quilting or sewing history, or are you a first generation quilter? 
I'm a first generation quilter. Both my grandmothers were knitters and one was a spinner and weaver as well but I think sewing generally fell into the 'mending' category for my nanas. I talked mum into letting me go to a community college night class when I was still at school because I wanted to learn how to sew. Yep, I was the 15 year old in the class of mature women...

How did you start quilting, and how long have you been quilting for? 
I started quilting after I went into a patchwork shop to buy some fabric to finish a cross-stitch project. There was a quilt on display that I fell in love with and I signed up to a beginner's class on the spot. That was in 2011, so that makes this my fourth year of quilting.

How would you describe your quilting style? 
I don't think I have one. I like trying out different styles and techniques as the spirit moves me. I like the modern aesthetic but quite often I'm drawn to more traditional quilts. I like quilts that have a sense of depth or movement but I'm still trying to figure out how to achieve that.

Peaks - I think Megan playing around with equilateral triangles inspired my own equilateral obsession

Where do you find inspiration for your quilts? 
I have a number of favourite bloggers so often I'll see something of theirs that inspires me to try something, whether it be a pattern or a technique.

Do you like to follow patterns or create your own designs (or a bit of both)?
I quite like patterns because I'm really lazy when it comes to quilt maths. But invariably I mess around with a pattern and adapt it a little, sometimes unintentionally if I'm honest. I'd create my own designs more if I worked fewer hours and had a lovely designated sewing room with a huge design wall and a door that I could close *sigh.

Are you a member of a local guild? 
I belong to a fun little Auckland group we call Monday Modern. We meet once a month to oooh and aaah over each others' projects, make confessions about our fabric issues, laugh, and complete challenges or bees.

Aerial

Have you ever met any of your online sewing friends in real life?
Yes! One day when I was bogged down in the final stages of writing my thesis, Liz (Shush, I'm Quilting) emailed me out of the blue to ask me how I was going with my thesis because I was on a blogging break. I was touched that a stranger (albeit a stranger that read my blog) had considered my real life, it was a lovely bright moment at a bit of a grey time. We started emailing and eventually we met and became friends in real life. I've not had online 'friends' before, so it makes me giggle to myself when I'm trying to explain how I met Liz to my non-quilty friends. I'm hoping to meet Rachel@woodenspoon, Deb and Julie at their next sew day, and disappointed not to meet you when you came along to Monday Modern. Hopefully another time?

How did you decide to start your blog?
Honestly, on a complete whim, and mostly to have a journal of my quilting adventures. I was very shy at first and wouldn't comment on blogs and thought no one would ever comment on mine so it was a bit of a solo endeavour for a while. I think Nicole (Mama Love Quilts) was one of my first few followers and kindly gave me some helpful tips.

Do people in your personal and professional life know about your quilting and blogging or do you keep it under wraps? 
I don't actively keep it a secret, but let's just say I may not talk about it all that much ;-)

AMH (I don't think regular readers will be surprised by my love for this quilt)

What is your favourite thing about the online quilting community? And what is one thing that you would change, if you could?
I like that it IS a community, so that if you have this quirky hobby and don't know anyone else who does it in your real life social group, you can connect with other quirky types :-) As far as changes go, that's probably best answered by talking about what I like. I love blog posts that narrate. I'm a reader, so I like some story and a discussion of process. I particularly like reading about how people make their design decisions. I would like to see us celebrating 'slow' a bit more and focusing more on process than end product. As Karyn (Milly Made It) likes to say "quilting is not a speed sport". I've also stopped following bloggers who are now predominantly advertisers. Probably enough said there!

Confession time - how many quilts do you have in your house right now?
A very modest five tee hee. I'm glad you didn't ask how many of my quilts live at my mother's house.

Do you do any crafts other than quilting?
I've done cross-stitch and tapestry on and off over the years. I used to do quite a bit of dress making but I haven't done that for ages.

Where do you see your quilting going - is it a career or a hobby for you and would you like to change that?
Haha, definitely a hobby only, it's the way I relax as a healthier alternative to wine drinking. Having said that, some of my academic research interests (I'm an education lecturer) are around alternative education spaces like online teaching and learning communities, and also around the complexity of relationships between capitalism and education spaces. So, while a big part of my involvement in the online quilting community is purely hobby based, quite often I find it helps me think in different ways about my work - maybe my quilting contributes to my career?!

Starburst

Do you have any tips or tricks or things that have changed your quilting life that you'd like to share? 
Mmmm. Don't use your ruler upside down when cutting. Measure several times before cutting, especially when trying to simultaneously watch tv. Have a large dark drawer or cupboard for naughty projects that need time out. Oh, and try a Sewline pen at least once for basting hexes.

What is your favourite part of the quilting process (and what's your least favourite part)? 
I love trimming (I'm reliably informed this puts me in the 'weird' category). I also love hand stitching bindings. I struggle to enjoy alligator wrestling which is how I think of machine quilting.

If you could do a quilting class with anyone at all, who would you choose?
I think I'd really like to do a class with Gwen Marston. Or Robyn Croft, who is a New Zealand quilter whose work I admire. Or probably just about anyone who had a quilty skill they wanted to share and was enthusiastic about sharing it.

Baby plus quilt

Are there any quilting techniques you haven't tried yet but that you'd like to? 
I've been a bit coy (read terrified) about appliqué to date. It's right up there with FMQ, which is my ultimate Moriarty.

What's something about you that people might be surprised to know? 
I'm really really squeamish and inclined to faint at the sight of blood or needles. When I taught in schools I used to warn my students not to count on me if they injured themselves. It goes without saying I'm super careful with my rotary cutter.

Thanks so much to Megan for participating.  She's name-dropped a heap of awesome New Zealand quilt bloggers, so as well as checking out Megan's blog, Jaffa Quilts, you should really pop along and visit them too.

Follow on Bloglovin

Tuesday 22 July 2014

Fat Quarter Friendly Oven Mitt Tutorial (with patchwork option and afghan recipe)

I wrote this tutorial last year for Leanne at she can quilt as part of the 2013 Finish Along.  I've been meaning to re-post it here but came up with the idea of a version with patchwork pockets and felt like I really needed to try it out first!  So, here is the original tutorial, with some additional instructions in case you feel like making a version with patchwork pockets.  Also, I posted about making afghans, a very New Zealand biscuit*, on instagram lately, and someone asked if I'd post the recipe, so I thought I'd include it here.


This oven mitt is a pretty quick project, which I think is perfect for gifts - what could be better than an oven mitt customised to the recipient's kitchen?  It is also a solution to that gifts-for-guys dilemma we all face - it's something practical that a man who likes cooking will actually use (I made one for my Dad for Christmas 2012 and he's still using it). I personally really like this style of oven mitt because even if you don’t have any hooks in your kitchen, you can easily hang it over the handle of your oven, and it lets you use both hands.

To make this oven mitt, you only need a single fat quarter of your chosen feature fabric, which makes it a perfect project to use up those “just because” fat quarters – you know, the ones you bought just because you love the fabric, not because you had a plan for it at the time!

What you will need


- 1 fat quarter of your feature fabric
- 2 scrap pieces of fabric, 9” by 7”
- 34” by 11” piece of backing fabric
- 30” by 10” piece of low loft cotton batting
- 30” by 10” piece of Insul-Bright (insulated batting)
- At least 70” bias binding (2 1/4" or 2 1/2" wide)
- Freezer paper
- Printed template

Download templates here

Tips before you start

It's a good idea to read the full tutorial all the way through before you start.

When choosing fabrics for this project, bear in mind that they will be touching hot dishes.  For this reason, I would recommend that you stick to natural fibres like cotton and/or linen which can stand up to the heat. If you're not sure, think about whether you would iron the fabric hot and with steam.  If not, it's probably not suitable.

You need bias binding for this project so that it can go around the curved ends of the oven mitt - straight grain binding will not work. You can use store-bought bias binding or make your own.

If you use store bought bias binding, make sure it is 100% cotton, otherwise you run the risk of it melting on contact with hot dishes (I used poly-cotton binding on the first version of this oven mitt I made, and had to rip it off after I melted it with my iron...).

If you make your own bias binding, cut it the width that you would normally cut binding for a quilt.  I like a narrow binding, so I cut mine 2 1/4" wide, but with the extra layer of the Insul-Bright, it was a bit of a squeeze so 2 1/2" wide binding might have been better.

Finally, don't be put off by the inclusion of Insul-Bright in this tutorial.  I thought it might be expensive or hard to find here in New Zealand (we don't generally have as large a range of quilting goods available here as in the US, for example), but I found it easily and at several places.  I know it is definitely available at Spotlight in New Zealand and Australia, I believe it is available at Joann's in the US, and if necessary you can buy it online quite readily.

Step 1 – Preparing templates 

Print the template on A3 paper, making sure that your print settings are “actual size” or "scale 100%" – measure the 1” test square to check. Put a piece of freezer paper over your template, with the shiny side down, and trace around the template. Cut both piece 1 and piece 2 out of the freezer paper so that you have two freezer paper templates.


Step 2 – Preparing fabric 

Iron your fat quarter and fold in half, aligning the shortest cut edge with the selvedge. Square up the edges. Cut your fat quarter into two strips approximately 9” by 20”. Trim the selvedge off both pieces. Sew one scrap piece of fabric to each end of one of the fat quarter strips, and press, so that you end up with a strip approximately 9” by 34”. Press the fold line again to keep it crisp. 


If you are making the patchwork pocket version, you can use a strip of plain fabric for this step - but the principles are the same.

Step 2A - Preparing the patchwork pockets

You can make whatever patchwork you like for the pockets - you just need to end up with two pieces about 8.5" square.  You don't want to leave all the seams of your patchwork exposed though, because your pocket will fall apart after a bit of use.

Patchwork oven mitt

The solution is to line your pockets and it is really simple to do.  Take a plain piece of fabric which is the same size as your patchwork piece (I used white fabric to line my pockets because of the white based fabrics I used).  Place your patchwork piece and lining fabric right sides together and stitch together along one edge.  Fold the pieces so they are wrong sides together and press the seam so it is nice and neat.  Topstitch along the seam to create a nice finish. 

Patchwork oven mitt

Step 3 – Cutting pieces 

Put the freezer paper template for piece 1 on the longer strip cut from your fat quarter, aligning the straight edge of the template with the folded edge of the strip. Iron the freezer paper on to your fabric using a dry iron. Cut around the freezer paper template.

Put the freezer paper template for piece 2 on the shorter strip cut from your fat quarter, aligning the straight edge of the template with the cut edge of the strip. Iron the freezer paper on to your fabric using a dry iron.

Cut around the freezer paper templates and remove.  You should now have a single version of piece 1, and two versions of piece 2 for the pockets.


For the patchwork pockets version, follow the instructions as above.  Since you will have made each pocket separately, you will need to stick the freezer paper onto each patchwork piece and cut twice.

Step 4 – Making your quilt sandwich 

Make a quilt sandwich in the following order, and baste using your preferred method:

 • backing fabric – right side down
 • Insul-Bright insulated batting
 • cotton batting
 • piece 1 – right side up


Step 5 – Quilting

Quilt as desired. For durability, I recommend that you quilt the oven mitt quite densely. Personally, I think this project is perfect for trying out a new free-motion quilting design. A small project is easier to manoeuvre and doesn’t take long to quilt even if the design is complicated or dense.  That said, I was in the mood for straight lines when I quilted this particular oven mitt, and I think they look good too!

Once the oven mitt is quilted, use the edge of the feature fabric as a guide and trim away the excess batting and backing fabric.

Step 6 – Add the pockets 

Take both of the pocket pieces and fold the straight edge over ¼” and press. Fold over another ¼” and press again to create a tidy hem. Top stitch along the edge of the hem on each piece. If you are making the patchwork pockets version, you can skip this step because you have already created a finished seam at the top of your pockets.


Pin each pocket piece onto the quilted body of the oven mitt. Sew around the edge, about 1/8” from the edge. You won’t see these stitches once the oven mitt is bound, so don’t stress too much about making them perfect.


Step 7 – Binding

Pin the bias binding around the edge of the oven mitt, attaching it to the front side (with the pockets and feature fabric). Stitch in place using a quarter inch seam.


Finish the binding using your preferred method - I hand stitched mine down, but you could machine stitch it.


And you're done!

Patchwork oven mitt

This is my version with the patchwork pockets - you can see that I made a patchwork panel for the other side as well, just for fun.  I used the Arcadia collection by Sarah Watson for Cloud 9 Fabrics for the patchwork - it's just so pretty.

Patchwork oven mitt

Here you can see that my pockets are lined, so there are no exposed seams.

Phew - if you've made it this far through this mammoth blog post, you deserve a snack.  Afghan biscuits* are a peculiar New Zealand delicacy, although why this deliciousness hasn't spread further escapes me, because they are really good and really easy to make.  Here is the recipe, from my well used copy of the Edmonds Cookbook (another kiwi classic).

Afghans

200g (7oz) salted butter (use real butter, it's better)
1/2 cup (110g/3 7/8 oz) white sugar
1/4 cup (20g/3/4oz) cocoa (dutch cocoa is extra yummy)
1 1/4 (160g/5 5/8oz) cups plain flour
2 cups cornflakes (not the sweetened kind)

Chocolate icing*

Knob of butter, melted (again, use the real stuff)
Icing sugar*
1 tablespoon or so of cocoa
Boiling water

Preheat your oven to 180 degrees celsius (360 degrees fahrenheit).  Soften, but do not melt, and then cream butter.

How to make afghans

Add sugar, and beat again.

How to make afghans

Sift in flour and cocoa.

How to make afghans

Mix to combine.  Don't worry if your mixture seems too dry to start with - keep mixing and it will come together.  Use your hands if it's easier.

How to make afghans

Add cornflakes and mix well to combine.

How to make afghans

Form into balls (or thick discs, depending on your preference), and place on a greased or baking paper lined oven tray.

How to make afghans

Bake for about 15 minutes.  I usually put mine in for 10 minutes and then check how they're doing, and leave them in for another 3 to 5 minutes.  You want to err slightly on the side of undercooking, rather than overcooking.  Remove from oven using your pretty new oven mitt.

How to make afghans

Allow the afghans to cool completely, and then top with chocolate icing (mix all the chocolate icing ingredients from above together until you have a thick but still spreadable icing.  It's hard to give quantities but expect to use about 1 cup of icing sugar).  If you want, put half a walnut on each biscuit while the icing is still soft.

How to make afghans

Consume with tea or coffee or just on their own.  Store in an air tight container (we are using our delightful heirloom tupperware) until they've all been eaten (I'm sure afghans would go bad at some point but we've never hit it - they don't last more than a few days in my household).

*Translation for my US friends:
Biscuits = cookies
Icing = frosting
Icing sugar = powdered or confectioner's sugar

I hope you enjoy!  If you make an oven mitt (or afghans) using my tutorial, let me know!

Follow on Bloglovin

Monday 21 July 2014

Block a Day July - Week 3

This weekend I managed to take a quick photo of all my blocks so far.  I'm quite pleased with how my quilt is coming along (and that I'm more than halfway through the month).

Block a Day July - Weeks 1 to 3

This week's blocks, all in the bottom row. From left to right: 14 July - Fussy catting, 15 July - Stars, 16 July - Dreaming of summer (it's so bloody cold at the moment), 17 July - Drifting away.  Nine patch because that was what I was teaching that night, colours chosen because of that annoying but catchy song. 18 July - Nearly didn't happen but then I decided it was more fun than cleaning out the litter box, 19 July - Nearly silent, 20 July - A heart because that's a shape I can draw.

Here's the link-up for other people who are playing along.  I love seeing everyone else's blocks and there are some seriously cool things being made.


Follow on Bloglovin

Saturday 19 July 2014

Caturday Wisdom #77

Get out and about, it could result in delicious cobwebs! Ralph

I suppose they're like candy floss for cats but it's totally revolting, anyone else's pets indulge in this?
I think I need to plant some more cat grass for them when it gets a bit closer to Spring.
Happy weekend!

Friday 18 July 2014

I See Fire Quilt

For our local guild exhibition, we set a challenge based around the dresden plate block.  The idea was to make a small (36" square or smaller) quilt using one or more dresden plates, but to put your own twist on the block.

This quilt was my entry.  As you might be able to tell from the name, it was inspired by this Ed Sheeran song.  I wanted to create a fiery lava like background with dark swirling bits.  This quilt was a long time in the making - I started back in April, although I was plotting it for a while before that.

I See Fire Quilt 

The background is made up of 2" finished squares cut from my stash of peach/red/purple fabrics - a combination I've had pulled for more than 2 years.  The dresden pieces are made from a variety of fabrics, but mostly from a bundle of black based fabrics from Distressed Threads.  The added a heap of interest and variety to these little pieces (and yes, all those dresden blades were a huge pain in the neck to make!).

I See Fire Quilt

 I joined all the dresden blades together in groups of five (quarter circles), and then joined them in a slightly random meandering pattern.  I stitched all the dresden blades in place using a straight stitch.  Once the top was finished, I straight line quilted around all the dresdens, and then quilted swirls and pebbles in the background.  I used two layers of batting to make the quilting really stand out, which worked quite well.

I See Fire Quilt

Because the top is quite busy and all that quilting can get a bit lost, I wanted to use something solid on the back.  You definitely get a better look at the quilting, and you can also tell that I used a red and light pink variegated thread.

I was really happy with this finished quilt - it was definitely quite a jump out of my comfort zone and is probably the closest I've come to making an art quilt (although it's definitely still very abstract!).  I'm even more happy now because it won a merit award in its category at the show!  My Garden for Birds 2 quilt won two merit awards as well - one in its category of small bed quilt made by one person, and one as a quilt by a first time entrant.  A pretty good haul of ribbons from my first ever exhibition, I reckon!

Quilt Stats
Pattern: original design
Finished Size: approx 34" square
Fabric: many
Backing: Oakshott shot cotton
Binding: Skull Stripe, from Dem Bones by Sarah Watson for Cloud 9 Fabrics
Pieced and quilted by: me

I'll be linking up with finish it up friday at crazy mom quilts.

Follow on Bloglovin