Showing posts with label modern. Show all posts

Monday, 18 November 2013

Falling Softly - a low volume cushion cover

Have you caught the modern maples madness that seems to be doing the rounds at the moment?  I think it was started by this Modern Maples Throw Quilt which has gone viral!  Check out the flickr group which is jammed full of inspiration.  I caught a bit of modern maples fever myself, but since it's spring here and I'm already working on an autumn quilt (my Midnight at the Oasis Quilt), I didn't want to go overboard.

low volume 

So, I was restrained and instead made a cushion for the X-Factor Pillow Swap.  I've been lurking in this group for a while but hadn't actually participated before.  This swap is a little different to traditional swaps in that a theme is set (this round was low volume) and everyone makes a cushion but you are not allocated a specific partner.  Rather, once your cushion is finished, you send a photograph to the administrator and she uploads it to flickr so that no-one knows who make which cushion.  Then the cushions are voted on by the participants and the person who made the cushion with the most votes gets their first choice, the person who made the cushion with the next most votes gets to pick next, and so on.  I really enjoyed this format - it was a lot less pressure than making something for a partner and it was really fun to see all the different cushions.

Falling Softly Pillow 

Each maple leaf block in this piece finishes at 3" square.  I essentially used the same method as in the original pattern, but scaled all the sizes down.  It was actually rather fun making these tiny blocks (probably because I only made 9!).  I'm pretty sure the background solid is Moda Bella Snow - a nice creamy fabric.  I really wanted to add texture to all that solid go I free motion quilted the cushion cover with my go-to flower design (of course, using Aurifil 2021).  The quilting is really dense in the centre and then the design gets a bit larger to the sides - a simple way to add a bit of interest.

I was a bit sad about sending this cushion off to someone, until I got told who was getting my cushion.  It has now arrived with the lovely Rachel - a fellow New Zealander and the creator of so many gorgeous quilts and swap items (really, go and look at her flickr photo stream and swoon).  We are yet to meet in person but I'm sure it will happen one day!
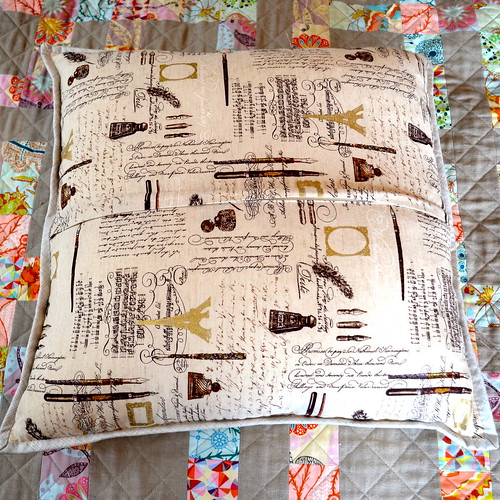
Falling Softly Pillow 

The back is a random Japanese cotton/linen blend fabric from Spotlight - with text and writing instruments and hints of gold I thought it was sort of appropriate for an autumn cushion.  I have been enjoying using slightly heavier weight fabrics (like a drill or a duck) for the back of cushions lately and I looked for something suitable but couldn't find anything.  This lighter weight fabric is fine too, especially since the front of the cushion is so heavily quilted.

Falling Softly Pillow

I added a lapped zipper to keep the back really neat and tidy - I think this is my new favourite way to make a cushion back.  I find it quicker and more economical with fabric than the covered zipper technique where you add a contrasting strip and I think it looks more professional than an envelope back.  I'm planning a tutorial on this technique because although its easy to do if you work through instructions step-by-step, it is seriously non-intuitive!

Now I'm just waiting for the pillow I've been allocated to arrive.  I don't know which one I'm getting, but given how difficult I found it to rank the entries in order of which one I preferred, I'm very confident I'll love whatever shows up!
Linking up with finish it up friday at crazy mom quilts and Sew Cute Tuesday at Blossom Heart Quilts.

Follow on Bloglovin

Tuesday, 30 October 2012

Equilateral quilt - top completed

I've had this quilt top finished for a little while, but it took some time to press it, and then I needed some tall assistants to photograph it.

Modern sixty degree triangle quilt

It's hard to tell the dimensions from this picture, but this quilt measures 84 inches (214 cm) in length and  is 87 inches (221 cm) wide.  It doesn't sound that big, but I am 5'8" and I couldn't hold it off the ground lengthwise.

Sixty degree triangle quilt

I am very very happy with this quilt.  I plan to baste it this weekend, at my parents' house, because there isn't anywhere in my house I can lay it out (at least not without moving lots of furniture around).

Sixty degree triangle quilt

So, which tall people helped me get photos of this quilt?  My brothers, of course.  Aren't they delightful?  The one on the left is the shorter of the two, at 6'2".  The one on the right is the recipient of this quilt, and at 6'5", looms over the rest of the family.

Modern sixty degree triangle quilt

This photo session was quite a family affair - my sister took the photos.

Who helps you photograph your quilts?  Do they like to make faces as much as these two?

Tuesday, 23 October 2012

Equilateral triangle quilt - coming together

I had a big push on this quilt over the long weekend, and got all the rows of triangles sewn together.  I have sewn 10 of the 14 rows together in two lots of five.  I will sew the other four rows, and the final three sections, together over the course of this week.

These photos are of one section of five rows, without pressing the seams between rows.

Modern sixty degree triangle quilt
My incredibly sophisticated row marking system
It's a bit hard to tell before pressing, but I think the points on this have come out quite well given the number of bias edges.  I will do a little post about the ruler I used to cut the triangles, because I think it really helped with accuracy.

This quilt top should be finished by the weekend.  My plan is to get my brother to help choose the backing fabric (and to help me get some photos of the finished top).

Sunday, 21 October 2012

Dappled sunlight - nearly done

I found a suitable variegated thread, and quilted my dappled sunlight quilt today.  It is quilted about an eighth of an inch on either side of each diagonal seam line - I really like the effect this gives.


You can see the colours in the thread better in real life (green, yellow and orange).


I have my binding fabric all picked out so all I need to do is take out the basting pins and bind it.

Also, I am rather fond of the backing fabric (a cotton poplin from Spotlight), but no-one else seems to like the horses.  Please tell me - am I cracked?

Tuesday, 9 October 2012

Daisy baby

Ummm, so here is a quilt, that I finished this weekend, that wasn't on my WIP list last Wednesday.  Say what?  Well, I kind of cheated.  I made the top over a year ago, and it was sitting in my cupboard waiting for me to learn how to quilt.

Loopy Flower Quilting

After enjoying free-motion quilting the granny squares quilt, I was motivated to keep going and try something different.

Loopy Flower Quilting

One of my boyfriend's friends just had a baby girl, and I thought this quilt would be perfect.  I really really love the fabric - Just Wing It by MoMo for Moda.

Loopy Flower Quilting
  
I even had a metre of aqua dotty fabric in my stash, perfect for backing.

Loopy Flower Quilting

For the quilting, I used this loopy flower tutorial from Elizabeth Hartman at Oh, Fransson!.  My flowers only have five petals, rather than six, because I found drawing a five-petalled flower much more natural than a six-petalled flower (who knows why).  I also went a bit crazy with the echo-ing around.

Loopy Flower Quilting

Getting the flowers right took a bit of practice, but it wasn't too hard in the end.

Loopy Flower Quilting

Binding in crisp white completes the look.

Spotlight Aqua Dots

This quilt will soon be just winging it's way (ha ha, I am so punny) to its new owner.  I hope she likes it.

Loopy Flower Quilting

Monday, 24 September 2012

Granny squares are go

I put the top for my granny squares quilt together last weekend, and put the backing together and basted it at the same time.  I really wanted to do a quilting pattern that would bring the sashing and borders together so that they appear to be a single solid piece of fabric, while making the granny squares really stand out.  Time for some free-motion quilting.

Free-motion quilting

I had done a bit of free-motion quilting practice on scrap sandwiches before, with limited success.  This was my first "proper" FMQ project and I was quite nervous to start.  The quilting is definitely not perfect, but once I got my sewing machine set up on the dining room table and my quilting (aka light weight gardening) gloves on, it went quite well.  The fact that I used white thread on white fabric helps hide the wonky bits.
Free-motion quilting

I used a large meander type pattern to fill in the negative space but didn't do any quilting on the coloured parts of the quilt (that is why there are still basting pins there).  I will stitch these in the ditch to give the quilt a bit more structural integrity.  I never realised how quick FMQ would be - it only took me a couple of hours to do the whole quilt.  I expect that the straight-line quilting will take me at least as long.

Free-motion quilting

This is the backing fabric - I wanted to use something bright and cheerful that generally went with the fabrics on the front, but that wouldn't show through in the white negative space (for example, I have found that when backing a light coloured quilt with bright red backing fabric, the colour can make it look a bit pink on the front).  This is a large rose print fabric from Lecien's Flower Sugar range.

Cat on a quilt

It has the Ivy seal of approval.

Saturday, 8 September 2012

Nearly finished and some favourite fabrics

I am hand-stitching the binding to the back of this quilt, and it is very nearly finished.  You can catch a glimpse of the binding clip in this photo below.


This quilt is made from scraps and left-over blocks from a quilt that I made as a wedding present.  The fabric above (from Valori Wells' Nest line) was the inspiration for all the other fabrics and colours in the original quilt.


The wedding quilt was only the second quilt I made, but I ended up with some fabrics that I think will be long-term favourites - like the blue fabric from Anna Maria Horner's Good Folks line above.  If I could easily get more of this, I would.  As it is, I do still have some scraps left but mostly binding strips (2.25 inches wide) and squares for the nine patches used in the original quilt.


I also love this herringbone print from Joel Dewberry's Modern Meadow line.  I have it in a couple of other colours for other projects but I am tempted just to buy some in each colour just in case.  Will post pictures of the entire quilt when it is finished.

Friday, 31 August 2012

Fandango quilt

A follow up to the sneak peek a couple of weeks ago.  I bought a number of fat quarters of Kate Spain's Fandango line for Moda off TradeMe last year, and started putting them together into a quilt early this year.  The white sashing is a white on white print from Spotlight - I was not quite ready to go the whole hog and use a true solid.  You can tell by the granny squares that I have moved on...


Because there are quite a few different colours in the various print fabrics, I wanted to keep both the block design and sashing nice and simple.  Chunky squares surrounded by a (mostly) contrasting border keeps things pretty simple.

Quilt made with Fandango by Kate Spain for Moda Fabrics

Initially, I wanted to quilt this myself, even though it is quite large, at approximately 82 inches square.  I even got as far as basting the whole thing.  However, I really wanted denser quilting in the white areas and minimal quilting in the blocks.  I have done a tiny bit of free-motion quilting, but really need more practise and this was not the quilt for that.

Quilt made with Fandango by Kate Spain for Moda Fabrics

In the end, I had the quilt long-arm quilted by Sue Burnett with a light feather design in the sashing and a heavier feather design in the border.  The inner square of the block is stitched in the ditch to keep everything stable.  I have used Sue's long-arm quilting services before - she lives very locally to me and is fantastic.  I will definitely go back if I have other projects that I think would benefit from long-arm quilting.

Quilt made with Fandango by Kate Spain for Moda Fabrics

The quilt is backed with a striped fabric I picked up at Spotlight.  I think it works really well with the colours in the Fandango line.  It is bound with all those fat quarter strips I cut up.  Because this quilt is so large, and I have other projects on the go, I decided to finish the binding by machine rather than by hand, using this tutorial from Red Pepper Quilts.

Quilt made with Fandango by Kate Spain for Moda Fabrics

Overall, I am really happy with how this quilt turned out.  I am particularly happy that I decided to go with the feather pattern for the quilting - I think it really brings the quilt together.

Linking up with the Kate Spain Blog Hop at Blossom Heart Quilts:

  Kate Spain blog hop

Thursday, 16 August 2012

A sneak peek


I have a finished quilt but no photos yet.  I had it long-arm quilted and got it back this weekend. So I was forced into a task I was not much looking forward to.


I used Fandango by Kate Spain for Moda to make this quilt.  However, I didn't have any yardage - only fat quarters.  Therefore, since I wanted the binding to match, I had to make the binding out of fat quarters as well.  SO. MANY. BIAS. SEAMS. By some miracle, none of them ended up on a corner when I bound the quilt.


You can see another shot of the binding pieces all stacked up behind Ralph,


Ralph and his sister Ivy love "helping" me quilt.  They usually like to test fabric by rolling all over it, to make sure it is nice and soft.


Binding is sooo tempting for little cats.

Wednesday, 15 August 2012

All the Grannies

I was sick last week and had several days off work.  I cranked up the heater and camped out in the lounge with the Olympic Games and my sewing machine.


I had a quilt to bind, but was feeling too low on energy to try and wrangle binding onto it.  So, instead, I worked on my granny squares.


There are a lot of small pieces in each granny square, and a lot of seams.  Because I was working with charm packs, and wanted to keep these scrappy, I didn't really have the option of strip piecing these (although, if I made them again, I would be tempted to follow this method).  In other circumstances, the time consuming nature of this project might have driven me a bit batty.


I have cut quite a few of the sashing strips I will need to put this quilt together.  I have made them quite wide so the coloured granny squares will look like they're floating.  Now to trim all 25...

Thursday, 26 July 2012

Grannying along

Made a few more granny squares. Would have liked to do more but I have been busy at work lately. Never mind, grannies aren't usually known for their speed.

Monday, 23 July 2012

Blue baby rainbow

I wanted to make a fresh, modern, baby quilt for a colleague who is pregnant with her first baby.  I did not want to include novelty fabrics with trucks, cars, or sports references.   Rita's Indian Summer Quilt provided the inspiration.


This quilt uses fabric from a number of ranges.  I love the raindrop fabric on the back and used for the binding which is from Tula Pink's Prince Charming collection.


Also included are a number of other fabrics from Tula Pink's Prince Charming range, some blenders from Riley Blake, a Michael Miller check, one of the Floral Elements fabrics from Art Gallery Fabrics, a couple of prints from Valori Wells' Nest collection which I had left over from another quilt, and an indigo japanese quilting cotton.


I cut the fabrics into 8.5 inch long strips ranging in width from 2 inches to 3.5 inches.

  
Simple straight line quilting randomly spaced in a turquoise thread that blends with some fabrics and stands out against others completes the look.

Saturday, 21 July 2012

Granny squares

Made some granny squares following this tutorial from Blue Elephant Stitches.

I am using a couple of charm packs of Moda's Rose Parade and trying to keep it a bit scrappy by using different prints in the same colour for each ring.


Not thrilled with how the bottom one turned out, but maybe it will add to the scrappiness of the final quilt.  Two down, 23 to go.