Showing posts with label garment sewing. Show all posts

Sunday, 21 May 2017

Tamarack Jacket in Navy Linen and Nani Iro

I made a quilted jacket!  Specifically, the Tamarack Jacket by Grainline Studio.


The exterior is a beautiful medium weight linen from The Fabric Store (pretty sure it's this one).


I used wool batting - the Quilter's Dream kind because it's lovely and doesn't smell like sheep.  It's getting pretty cold here now so the wool should keep me snuggly and warm.


On the outside this jacket is very "I am a serious person walking a dog".  On the inside it's much more "I'm a free spirit who makes her own clothes".  That dreamy fabric is Nani Iro that I bought in Melbourne with Erin last year.  It's pretty much impossible to find in this colourway, but the print is Komorebi if you want to try.


I could definitely fit more layers under this jacket.


I made a (US) size 4 based on my measurements.  This is a size smaller than I expected to make, but it's definitely the right size for me (even though I used relatively lofty batting).  I lengthened the body of the jacket by 1.5", and the sleeves by 1".  I would lengthen them even more if I made this again - I just really didn't have enough of the lining fabric to do so this time.


I finished the binding on the front of the jacket and at the back hem by hand.  The rest is all machine stitched, and I bound all the internal seams as well, for a really tidy finish.


Thank goodness for sewing friends.  Erin made this jacket at the same time as me (actually she decided to make it and I was like "me too!").  She made two practice pockets and walked me through the making of these welt pockets which were a bit intimidating for a first timer.  In the end they were totally fine - use both the pattern instructions and the sew-along for best results.


I cut four versions of the "upper pocket"piece so that I could have the right side of fabric both inside the pocket and visible on the inside of the jacket.


I didn't have quite enough of the Komorebi print so I used a different Nani Iro print for the inside of the pockets.  I squeezed the lining out of about 1.5m of Nani Iro which is definitely less than the recommended amount.  Don't try this at home kids.


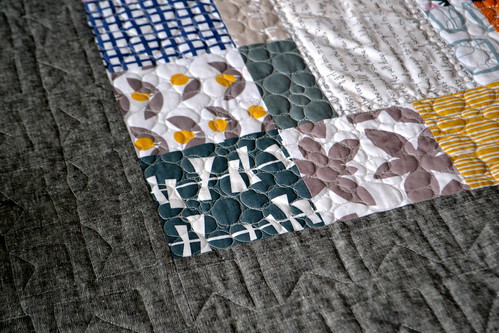
The quilting is Aurifil 28 weight thread.  I guess I thought that if I was going to make a quilted jacket, I wanted to see the quilting.  I used a medium blue on the outside and a medium grey on the inside.


Yeah these photos are just gratuitous now.


Oh it's the inside of the pocket again.


If it wasn't for the fact that this limey green makes me look like a corpse, I would be tempted to wear this jacket inside out.


Just embracing my inner dork and the Wellington wind.

Friday, 6 November 2015

Bondi Top - Nani Iro fabric

Another garment post!  Don't worry, I haven't stopped quilting (in fact I have three quilts just waiting to be bound and photographed so I can blog them), but I have been on a garment making kick lately.  

This time, I made the Bondi Top, designed by Lindsey from Sew to Grow.  I saw this top on Cath  and knew I had to make a Nani Iro version for myself.  Full disclosure - Lindsey provided me with a copy of the pdf pattern in exchange for a write up - but, as always, this review reflects my honest opinion.

Bondi Top - Nani Iro fabric 

This top really appealed to me because it's a simple, casual design, in woven fabric (easier for me to sew with since I don't have an overlocker of my own).  For this top, I used Nani Iro double gauze in En Garden Apricot, which I bought from Stitchbird Fabrics.  I really like the double gauze for this purpose - it's like wearing a cloud, and so much more flattering than quilting cotton.  It was also easy to sew with - win!  I also found the bias tape that I used for the neckline at Stitchbird - I know how to make my own bias binding but buying it was so much quicker and easier!

Bondi Top - Nani Iro fabric 

Based on my measurements, I made a size small top, which I think is the right size for me but ended up being shorter than I would really like.  I have a long torso, so I think this is my issue, rather than the pattern, and for the next version, will add an inch or so to both the front and back pieces.  The pattern contemplates a contrast yoke at the back - I just used the same fabric because 1. I am lazy and 2. this fabric is patterned enough for me as is.

Bondi Top - Nani Iro fabric

This top was really quick and easy to sew up, taking about two hours total once I had taped the printed pattern together (always the worst part of garment sewing, for me!).  I didn't have any trouble following the directions, and Lindsey has video tutorials for the bits that might be slightly harder (like adding bias tape to the neckline).  It's comfortable and cute and I've already bought fabric (more Nani Iro from Stitchbird) to make another version!

Have you found any great garment patterns lately?

Follow

Wednesday, 28 October 2015

Moneta Dress - Black Double Knit

After making my first Moneta dress on Saturday, on Sunday I whipped up another one, using a few things I learnt from the first one.  This time I used a heavier black double knit fabric from The Fabric Store, with a white messy dot print on it.  Although this fabric is definitely not 100% cotton, it is quite heavy and stable so it was nice and easy to sew with like the Anna Maria Horner fabric I used for the last version.

Black Moneta

I am really thrilled with this dress and will definitely be wearing it to work!  With blazer, most likely.

I asked people for questions about sewing with knits on my last post, and I've had a few.  I want to say that I am by no means an expert at sewing with knit fabrics, but I'm happy to share what I learnt.

Black Moneta

I made a few adjustments for this dress, based on my experience with the last dress.  The waist in the purple dress is pretty tight on me, so still used a size small bodice for this one, but graded up a size (to a medium) for the waist.  Now I can eat lunch in this dress!

Other tweaks - I only lengthened the bodice by .75", which I think looks better on me.  I also used the size xs neckline, because the neckline on the other dress tends to show my bra straps (not ideal for something I want to wear to work!).  Because the fabric is quite heavy, I kept the size small skirt, which means it is not quite as heavily gathered.  I also omitted the pockets, which I kind of regret now!

Black Moneta

I wasn't super stoked with the neckline on the last dress - it was my first time sewing with a twin needle and I didn't do the greatest job.  

This time, I used a technique to stablise the fabric before hemming, not only on the neckline but also on the sleeves and hem.  Basically, I cut narrow strips of fusible webbing (1/2" for the neckline and sleeves, and 3/4" for the bottom hem), and ironed them right at the edge that I wanted to hem.  I then turned the hem over and pressed it in place, before stitching as usual with the twin needle.  The fusible webbing made it easy to get a consistent hem width, held the hem in place, and kept everything stable so I didn't stretch out the neckline (but also didn't prevent the knit fabric from stretching entirely).  I used Steam-a-Seam Lite, because that is what I happened to have on hand, but I expect other fusible webs would work equally as well.

Black Moneta

Here are my thoughts about sewing with knit fabrics as a beginner:

- Do yourself a favour and start with a knit fabric that will not make your life hell.  Choose something that is thick-ish (but not super thick), and stable (i.e., not super stretchy and not too prone to shifting).

- Use a solid colour or a print you do not have to match.  No stripes (at least, not until you're feeling more confident).

- Pre-wash your fabric.  I almost never pre-wash fabric for quilting, but I always pre-wash fabric for making garments.  It's just not worth the heartache of making a perfectly fitting garment that shrinks the first time you wash it!

- It's worth taking the time to trace the pattern onto something you can re-use.  Erin made me do this and it was so worth it.  We used a very light weight interfacing but apparently Swedish tracing paper is the thing (but expensive / hard to find in New Zealand).

- I used pins to pin my pattern to the fabric, before cutting.  I just used a normal amount, not heaps.  I also used the same pins that I use for quilts - nothing special.  You could probably use pattern weights instead - I had to use weights (actually the hot pads the cats sleep on in winter) to hold my fabric on the table because it was long and kept wanting to slide off!

- I used scissors to cut my fabric.  I believe you can also use a rotary cutter.  I know from cutting curved pieces for quilts that a smaller blade (i.e., 28mm rather than 45mm) is better when cutting curves with a rotary cutter.

- If you can get your hands on an overlocker / serger, do it! Beg, borrow, or steal.  I think it made the experience MUCH simpler and easier.

- If you are going to use a sewing machine, use ballpoint needles.  There is a reason the instructions say to do this!

- Be really careful with your twin needle.  Apparently they are prone to breaking.  I had a backup one, just in case, but didn't break mine (phew!).  Also, if you can get your hands on a wider one, I think it gives a more professional finish (I used a 4mm one).

- I used clover clips to hold the pieces together when constructing the dress, rather than pins.  This is because overlockers + pins = BAD.  It also meant I avoided putting any necessary holes in my dresses.

- Again, if you are planning to make a Moneta dress, I would highly recommend reading the Colette Moneta sew-along and this post about using clear elastic.

Ok, that is all from me for now!  If you have other questions, let me know!

Follow

Monday, 26 October 2015

Moneta Dress - in Anna Maria Horner fabric

I've recently been inspired to sew garments again.  I think it's the influence of several things, including Cath's beautiful Bondi Top, and meeting Lizzy House and new kiwi / Canadian ex-pat Erin Charter, both of whom have amazing handmade wardrobes.

Anyway, I bought several yards of this lovely purple knit designed by Anna Maria Horner last year when I was sewing garments, and then never did anything with it.  Since it was a long weekend here, and I had Erin to help me, I pulled it out to make a dress using the Moneta pattern by Colette Patterns.  One of my lovely IG friends, Nancy, responded to my call for help and lent me her overlocker / serger for the weekend, which made things MUCH easier.

Purple Moneta Dress 

The Moneta is one of the most made and blogged indie patterns out there, so it was really helpful when I was deciding what to make to read everyone else's posts about it.  For the sake of being helpful to other people who might want to make it, I am 5'8" and in this version made a size small, but lengthened the bodice 1.5".  I didn't alter the skirt at all.

Purple Moneta Dress 

I had read Karyn's post which mentioned the issue with excess fabric under the arms.  I took the armpits in 1/2" but you can see there is still a bit of excess fabric there.  I didn't have this issue on the second version (which I will show in another post), so I suspect it might be partially caused by this fabric not having amazing recovery (it's 100% cotton which made it easy to sew with but it doesn't spring back into shape as easily as fabric with a nylon or other polyester type content).

Purple Moneta Dress 

You can see here that the neckline is lower on the back than on the front - pretty cute!  These photos were taken in slightly challenging light, hence all the sparkles (and I would like to blame my glowing white skin on the light as well but I suspect that is just me...).

Purple Moneta Dress

So, yeah, I'm pretty happy with this dress.  It will be a cute weekend outfit for me as the weather starts to warm up, and it's super comfy.  Colette describes the pattern as being for beginners, and generally I would agree with that - the only thing I found slightly tricky was attaching the top of the skirt to clear elastic, and hemming the neckline.  I'm sure it would have been quite a bit more work without an overlocker though.  If you are planning to make this dress, I would highly recommend reading the Colette Moneta sew-along and this post about using clear elastic.

When I share the other dress I made, I'll include a few more details on the tweaks to the pattern that I made which resulted in a better outcome for me, and the technique I used to get a much nicer result on the hems.  If you have any questions, shout out and I'll try and include the answers in that post!

Follow

Monday, 17 November 2014

Echino ruby dress

Phew - it's been a bit quiet around here lately!  Happily, I had a quiet weekend which allowed me to finish a few bits and bobs so I have some things to blog about.

Echino Ruby Dress

Back when I made my first Ruby dress (and my second, in the same weekend...), I bought this Echino fabric from Stitchbird with the idea of making a summer version.  Apart from the lovely print, I really liked this slightly lighter weight linen/cotton blend fabric - I think the linen content makes it drape slightly better than a pure cotton, and it's extra wide as well (yay!).  I pre-washed the fabric and then it sat around for quite a while, until I realised that my day trip to the Auckland Festival of Quilts with my quilting buddies was coming up fast, and that it would be the perfect place to wear a crazy quilty dress! (It was, and it was also an awesome day where I got to hang out with my local quilting girls, and catch up with or meet a bunch of lovely kiwi bloggers who you should really check out, including Rachel, Deb, Julie, Juliet, Leonie, Liz and probably others that I've missed!)

Echino Ruby Dress

I whipped this version up in a day - it really is a super easy make.  I ended up making a size small (the first version I made a size medium, and the second version has a medium yoke and small body pieces), which was definitely a good move in this lighter fabric.  I also added about 4" of length to the body pieces, which, for me, still left the dress above the knee but a bit longer than a mini dress.

Echino Ruby Dress

This is the back view - it's a very comfortable dress and I'm sure I'll get a decent amount of wear out of it in summer when the weather is warmer.  Rae's Ruby Dress and Top pattern is great and I would totally recommend it if you're a quilter wanting to dabble in garment sewing.  I think I'll have to try the top version soon!  And sorry, I know there are no pics of me wearing the dress.  I've been sick lately and I just couldn't summon up the energy to get dressed up and take photos!  I may post pictures at a later date though.

I'll be linking to finish it up Friday at crazy mom quilts later in the week!

Follow on Bloglovin

Monday, 11 August 2014

Ruby dress (rhino version)

During the course of last week, I finished the second ruby dress (pattern, of course, by Made by Rae) that I had started on the weekend. 

Ruby Dress (version rhino)

This version includes a black pinstriped lightweight wool blend suiting body, and a cotton linen yoke featuring rhinos.  The black fabric is from The Fabric Store, now my shop of choice for garment fabrics, and the yoke fabric is this one from Stitchbird (I love it and now I want to make a quilt featuring it!).

Ruby Dress (version rhino)

Instead of binding the armholes like the pattern suggests, on this version I stitched both raw edges of the binding to the armholes and then turned it inside the dress and hand stitched it down, so it's more like a facing.  You can't see it in these photos but I used a hot pink dotty fabric and you can catch a little glimpse of it now and then.

Ruby Dress (version rhino)

Because the body fabric was a lighter weight than the purple wool blend I used for my first ruby dress, I cut a size small body piece and paired it with a size medium yoke.  I think that works better for me - there's not as much excess fabric and I'm still not in any danger of the dress being too small.  This version turned out slightly shorter than the first ruby dress, so I'm writing this as a reminder to myself - I really need to add more than 2" to the pattern pieces to get the right length - more like 3" or 4".  This one is fine as a winter version where I'll always be wearing tights with it, but it would be too short for me to feel comfortable without tights and therefore wouldn't work as a summer dress.

Ruby Dress (version rhino)

This photo is good because it shows the subtle pinstripe in the  black fabric, and if you look at the neck very closely, you can see my hand stitching where I sewed down the binding/facing.  I used a light grey Aurifil thread (number 2600 to be precise) and was quite careful to make my stitches small and evenly spaced, because they are slightly visible on the outside of the garment.

Ruby Dress (version rhino)

This version has actually had an outing to work already.  I got a few strange looks on account of the rhinos, but very few comments.  It's very comfortable, and I felt good about wearing something I'd made myself (and a little bit subversive with my rhinos in a corporate office environment).  I'm really pleased to have another handmade addition to my wardrobe.

So are there any other quilters out there taking on garment sewing?  I had some lovely Anna Maria Horner knit fabric arrive during the week and I'm alternately excited and nervous about making something out of that.  I'm thinking that a t-shirt might be a good place to start...

I'll be linking up to finish it up friday at crazy mom quilts.

Follow on Bloglovin

Monday, 4 August 2014

Ruby dress (the first)

I bought the Ruby dress and top pattern from Made by Rae, and posted about thinking about making a dress, almost a year ago.  At some point on Friday I decided that this weekend was the time.  I managed to sneak in a visit to The Fabric Store on Friday after work (only to find they had a sale on, bonus!), and by the time I went to bed I had this dress cut out and mainly assembled, with just the seam finishing and binding to do.

Ruby Dress (version 1)
Can be worn with belt

I used a woven, textured, medium weight wool blend fabric.  It was lovely to work with - it had enough body to make sewing with it quite easy, and didn't fray very much at all.

I am terribly lazy and didn't bother making a muslin.  Based on my measurements, I made a size medium which worked pretty well in this slightly heavier fabric, and because I'll always be wearing something underneath it.  I've since cut another version in slightly lighter fabric - I used the size medium yoke pieces and size small body pieces, and I think that's going to be a little bit more flattering.  I also added about 2" of length to the body pieces - the dress still sits above my knees but the extra length means I can sit down and bend over without flashing anyone.

Ruby Dress (version 1) 

As I said in my original post on garment sewing,  I do have a bit of experience, but my previous garment sewing adventures were never that successful and usually a bit fraught.  I also haven't sewed any garments for nearly 10 years.  Sewing up this dress was honestly a breeze, and I really think that if you know how to make a quilt, you could sew this up without any real difficulty.

Ruby Dress (version 1) 

I recently bought a Janome 4120QDC (yes, if you're counting, that makes four), which has lots of different stitches.  I put it to good use finishing the seams of this dress with an overedge stitch and then stitching them flat.  I also used the blind hem foot and special stitch to create a blind hem at the bottom of the dress.

Ruby Dress (version 1)
or without a belt

Anyway, I'm really thrilled with how this dress came out.  At first I was a bit disappointed that I didn't manage to choose a crazier fabric, but actually I really love the colour and texture of this fabric and I think I'll get a lot of wear out of this version (I'll be adding it to my work dress rotation just as soon as I buy myself a white shirt to wear with it - I'm wearing my sister's shirt in these photos).

Ruby Dress (version 1) 

I'm so not a natural at being photographed.  I feel quite uncomfortable in front of the camera and that definitely translates to how I look - I end up looking stiff and kind of grimacing instead of smiling.  Fortunately my sister is great at putting me at ease and telling me exactly what to do if I'm looking weird.  Sometimes though, I'm just a doofus.

Ruby Dress (version 1) (outtake)
Outtake for your amusement.

So, has anyone else made a Ruby dress?  Are you thinking about it?  As a demonstration of how easy this pattern is to follow, I have another version finished apart from the hand stitching around the neck and arm holes, and a third version cut and assembled but with none of the finishing work done.

I reckon I can sneak this in as a finish, even though it's not a quilt, so I'll be linking up to finish it up friday at crazy mom quilts.

Follow on Bloglovin

Wednesday, 16 October 2013

WIP Wednesday

Just thought I would drop in with a little update on the cowl I'm making with this knit fabric.  I still have to hand stitch the turning gap closed but it's hidden in this photo.

Soft knit cowl in progress

I had a horrible cold this weekend so my face was not fit to be seen!  I'm feeling a lot better now thank goodness.

This cowl is very simple to make but I'm thinking about putting together a tutorial together with a few tips on sewing knit fabric that I learned in the process of making this.  Anyone interested?

Linking up with Lee at Freshly Pieced:

WIP Wednesday at Freshly Pieced

Follow on Bloglovin

Monday, 30 September 2013

Tidbits from my weekend

I had a very nice weekend, which included a haircut, a quilt guild meeting, and lots of time sewing with my friends.

Letter from Lotta Quilt - nearly finished

I had hoped to have this quilt finished to show you today but I'm still finishing the last of the binding.  It will be my last finish for the 2013 Finish Along.  Are you ready to link up your projects?

Knit fabric

I also went shopping for fabric to make my Ruby Dress. I wasn't actually terribly successful on the dress fabric shopping, but this lovely knit caught my eye and I had to get a metre of it.  I think I'll just sew it up into a simple cowl, and it will make a lovely soft spring scarf.

Friday, 20 September 2013

Sewing...clothes?

Uh oh.  People, I'm thinking about sewing clothes.  I have a history with garment sewing - through my teenage years I sewed clothes for myself somewhat regularly - usually with much wailing and gnashing of teeth (and help from my mum).  Believe it or not, I find piecing quilts much easier than I found sewing garments.
Recently I've been thinking more about trying to make my own clothes again.  My sewing skills have definitely improved so I'm hoping I might be a bit more successful than previously.  It would also be nice to have a spring/summer dress that's actually the right length.  At 5'8" I'm not exactly super tall, but I'm tall enough that dresses which are meant to sit just above the knee end up sitting quite a lot higher on me.

Ruby Dress - lined yoke
Ruby Dress by Made by Rae.

Anyway, the other day I saw that Rae of Made by Rae has just released a new dress (and top) pattern - the Ruby Dress and Top.  It's described as a pattern for a beginner sewist, which sounds right up my alley.  Unlike some of the other patterns out there which I can tell will not suit me, I think the shape of the Ruby Dress will work for my body (fingers crossed!).

Even though I'm a huge fan of using quilting fabrics in my quilts, I'm not planning to use them for this dress.  Instead, I think I'll take the opportunity to visit The Fabric Store, a local shop which stocks a great range of amazing garment fabrics.  I've been there before and lusted after all the gorgeous fabrics, but couldn't see how I would use them.  Haha - now I have a plan!

So - any other quilters out there trying their hand at garment sewing?  Anyone specifically planning to make this dress?  I'd love any tips you might have.  Mum, I might be calling you bringing my debacle of a dress round for you to fix...