
Dear quilt-as-you-go,
I'm sorry. I thought you were kind of lame. An inferior method only to be used in extremis.
Well, I was wrong. I was unfairly maligning you.
It was so much easier to quilt the blocks as I made them. Putting them together really wasn't hard and I like the sashing effect.
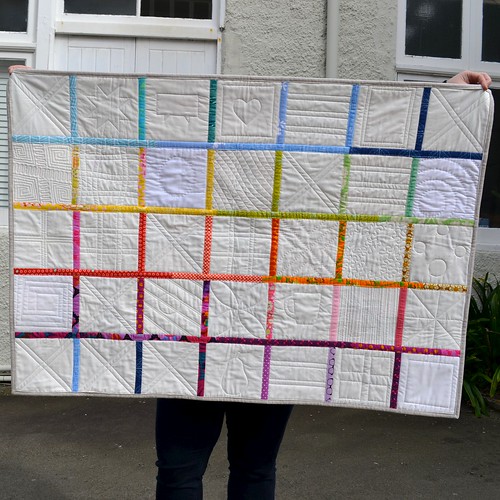
And, I love how the back looks - you let me make it much more interesting than it otherwise would have been.
So, quilt-as-you-go, thanks for the lesson and I'll be seeing you again. Lots of love, Adrianne.
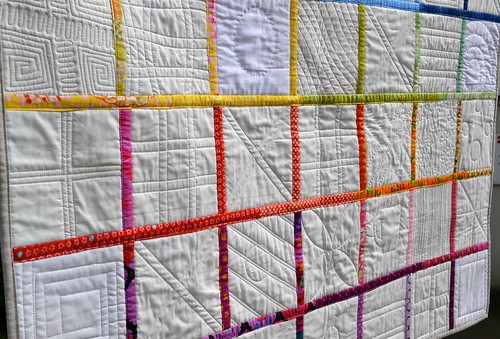
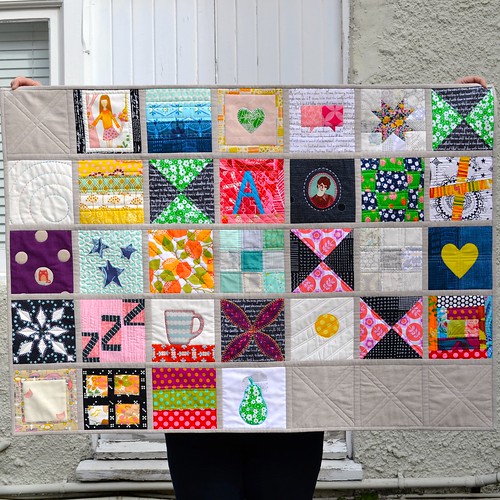
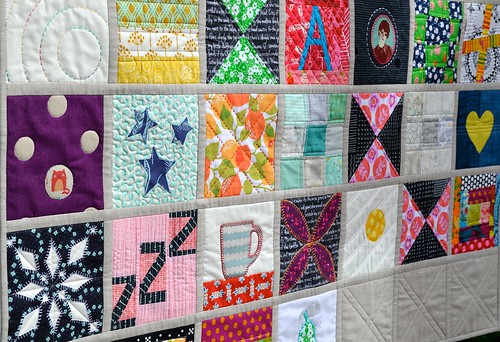
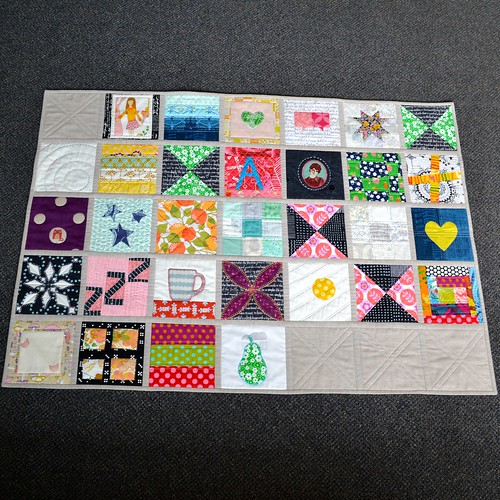
These are the blocks I made during July as part of my block a day July challenge. I generally used Alison from Little Island Quilting's QAYG method to assemble them, except that I cut my strips for the front 1 1/8" wide and my strips for the back 1 7/8" wide. I also stitched in the ditch from the front rather than stitching from the back, and I glue basted the strips on the back before I stitched them in place.
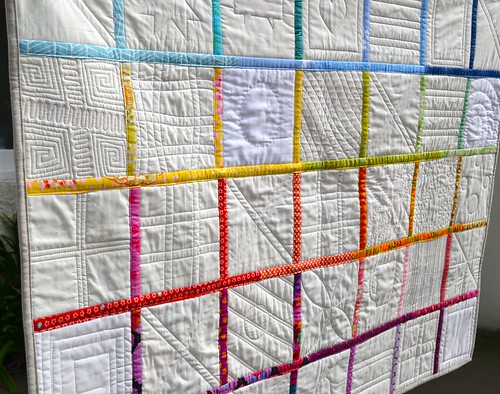
I'm quite thrilled with how this quilt has come out. I didn't really have a vision for it before I started, and it's very colourful and random. I decided just to add in some plain blocks to fill in the blank spots so I would have a regular shaped quilt. You can see there are a couple of blocks when I grabbed the wrong white for the back of my quilt - at night, it was hard to tell, but in daylight it's pretty obvious (I'm ok with it).
So, have you done quilt-as-you-go before? Would you give it a try?

18 comments:
Love this! I have used QAYG a few times and while I don't hate it, I don't love it either. The hitch is that the sashing strips really need to be a part of the design-- like yours are, you can't try to hide them. This looks great, I love the back!
Your quilt is fab :-) qayg is an awesome technique. I should try it more often :-)
Love the quilt! I am going to have to try QAYG.
I love how it turned out; the backing might just be my favorite because of the colored sashing and quilting detail on solids (swoon!).
This is so cute! I have read lots about QAYG but haven't tried it yet. Love the sashing on the front, but the back is really pretty!! great job!!
It looks fantastic! I've been wanting to try the same idea as you with a block a day since you started! Someday i will ;) I love the extra blank blocks you added in, kinda makes it look like a calender. And the back is just as awesome as the front! Great work!
I too love the back...just enjoying all the different quilting! The front is great too mind you, especially as I followed your daily writing! And, I kinda like the different whites! so lovely all round really! L
Hi Adrianne! This is fantastic! I haven't done qayg but made me want to try. Wonderful idea to add those colourful strips. I love this quilt! x Teje
Looks awesome! Haven't tried it before but given such high praise I might just attempt it one of these days!
Wow, it turned out great! The layout looks like a calendar which is pretty apt for block a day!
I love this happy little quilt Adrianne! The neutral blocks are the perfect foil to fun shapes and colours! Another triumph to you!
I've never done it, but seeing what a neat result you've had, Adrianne, I think I should add it to my to do list! Especially love how you sashed the back : )
Wow this is great and I am so happy you gave it a fair shake. I have only done this once on a quiltalong last year. The blocks were big though like 14 1/2 inches. They were super easy to quilt as I made each block. However I used warm and natural as my batting and the quilt had 20 blocks. The weight of putting the rows together this method was not bad but when I started sewing the columns together the weight of the whole piece pulled even my glue basting so that my blocks don't totally line up top to bottom. I was not off by much but to me it is noticeable. I basted with glue and pinned like crazy and they still were too heavy to stay in line. Overall I loved the process and I am pretty sure I will do it all again. Might change up the heavy batting though. I love your scrappy sashing on the back.
Your quilt is beautiful and you have inspired me to try my hand with the QAYG method. L.O.V.E. the colors you used for the back sashing and I like the different back color you accidentally chose for those two blocks. It gives it even more interest! Great job! Thanks for sharing, I always love reading your blog :)
I love how you did the extra blocks, and the back sashing is great!
Your quilt is beautiful, and I'm really impressed with your staying power! I've never done QAYG, I've always been too confused by the sashing/joining explanations. But yours, and one I saw recently - possibly by Chrissie D on her trips down memory lane series - have reduced my confusion (and fear). I'm planning on practicing FMQ on a layer cake, one square a week which gives me time to rip and play with tension as needed. In the end I'll have a whole quilt!
Nope, I never have, and now that I see yours, yup...I will give it a try! I'll have to look at a few tutorials, though, as I'm not visualizing it.... And can you say why you made the strips different sizes for the front & back ( and should I do the same?). I L.O.V.E. Adding the blank squares! Very clever!
I tried QAYG once, with less than stellar results, but I think I need to try it again. Your quilt is awesome!
Post a Comment