Tuesday 30 April 2013

Paper Petals Quilt

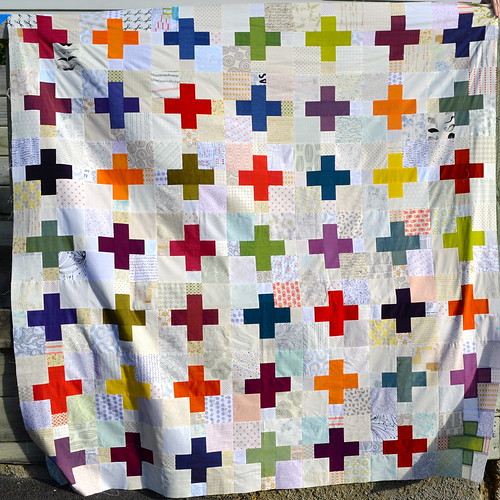
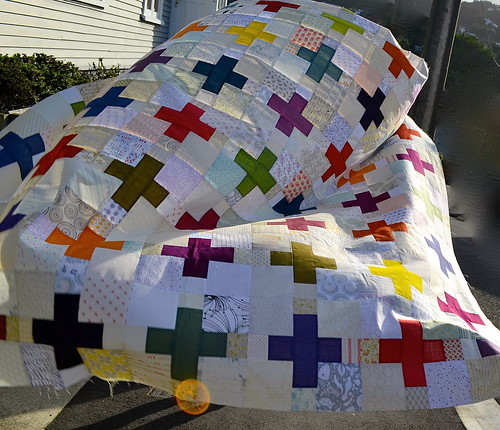
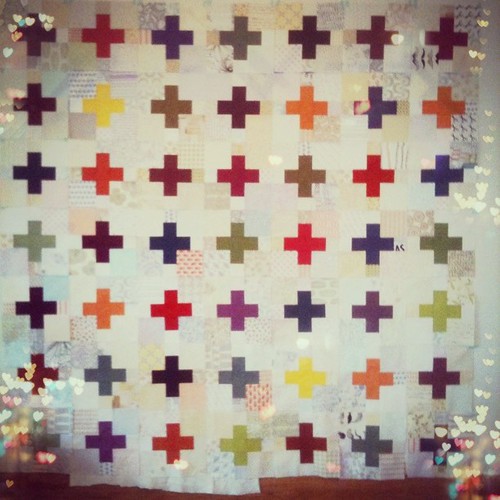
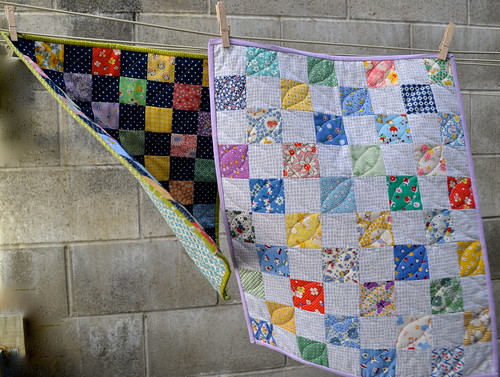
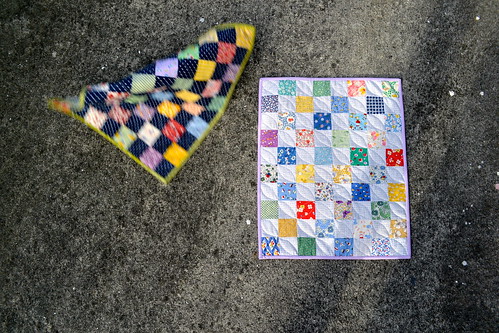
I am so pleased to finally be able to share this quilt with you!

Paper Petals Quilt

It is featured in Issue 13 of Fat Quarterly, out now!

Paper Petals Quilt - back

I designed this quilt back in December 2012, and made it up over January and February this year.

Paper Petals Quilt

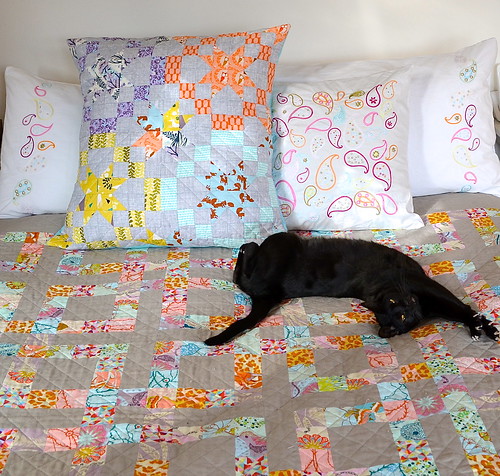
I really enjoyed using the Noteworthy collection, by Sweetwater, for Moda, to make this quilt.  It was really hard not to share progress pictures and the finished quilt once I was done.

Paper Petals Quilt - binding

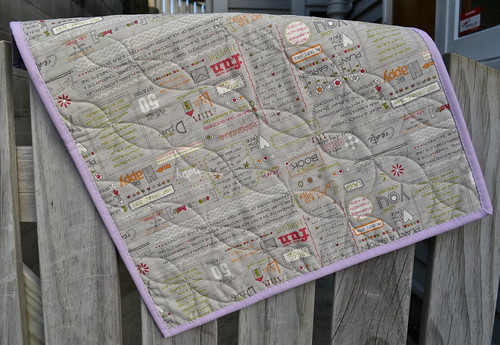
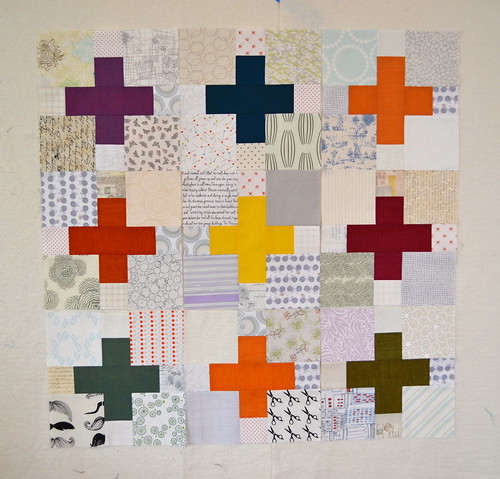
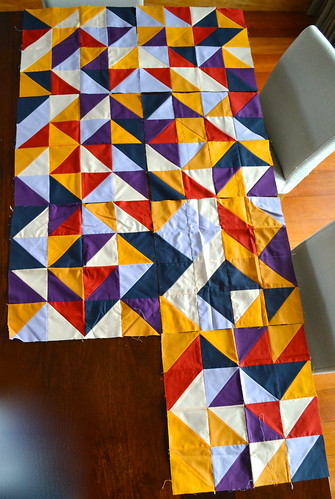
Apart from the back and the borders, this whole 90" square quilt was paper pieced.  No way could I have done this quilting - it was done by the talented Sue Burnett.

Paper Petals Quilt - close up

So, if you are interested in making your own version of this quilt, check out Issue 13 of Fat Quarterly - and do let me know, I'd love to see it made up in different fabrics!


Quilt Stats
Pattern: my Paper Petals pattern, available in Issue 13 of Fat Quarterly
Finished size: 90" square
Fabric: Noteworthy by Sweetwater for Moda, Moda Bella Snow
Backing: Text print and floral print from Noteworthy by Sweetwater for Moda, both in Cloudy
Binding: Assorted green prints from Noteworthy by Sweetwater for Moda
Pieced by: me
Quilted by: Sue Burnett on her long-arm machine.

Linking up with Finish it up Friday at crazy mom quilts.

Monday 29 April 2013

Oakshott and low volume plus quilt top

I managed to get some photos of my Oakshott and low volume plus quilt top this weekend.  

Oakshott and low volume quilt top complete

Actually, for a change, my sister was the photographer, and I was the quilt holding assistant.  A typical Wellington windy day meant I was holding on for dear life and my sister was trying not to get smacked in the face by the end of the quilt!

If you are interested in making something similar, you can find the measurements I used to make these blocks here, together with the similar but slightly different measurements used by Rachel, whose quilt inspired mine.

Oakshott and low volume quilt top

I'm really happy with how this quilt has turned out so far.  I don't think the background looks too busy any more, and I love how vibrant the Oakshott fabrics look against all the low volume fabrics.  The variation in the low volume fabrics is great too - it's a bit like a grown-up eye spy quilt!

Oakshott and low volume quilt trying to escape

Now, I just need to find a backing and work out how to quilt it. Any suggestions for the quilting design? This one has me kind of stumped!

Linking up with:

Plum and June Better Off Thread Fresh Poppy Design

Saturday 27 April 2013

Saturday Cat Words of Wisdom #16

I'm very excited to share the very first Saturday Cat Words of Wisdom video!


The cats are going crazy for cat grass - it grew like crazy over summer and I had to keep giving the plant a haircut.  The cats like it so much that I have to restrict their access to it otherwise they will eat so much they throw up.  Good times!

Does your pet have something to say? If you would like to see your pet on a future Saturday Cat Words of Wisdom post, send me an email (adrianneonthewindyside at gmail dot com) with the photo you would like featured, some words (wise, witty, or just plain silly) that relate to the photo, your pet's name, and a link to your blog/flickr stream/website.

Friday 26 April 2013

Modern She Made - finished swap items

I finished up both my items for the Modern She Made swap this weekend.  I'm really happy with how they turned out, and I will be sorry to see then go, especially the large cushion.  The cushion finished up around 20" square, and is stuffed with a 20" pillow form here - just right for lounging on the sofa!

Modern She Made cushion 

I stuck with very simple quilting on the front of the cushion - with all the colours, patterns and small pieces, I didn't think it needed another design element.  I had my fingers crossed the whole time I was quilting because I was right down to the end of my only spool of the dark grey thread.  I made it, but only just!

Back of Modern She Made cushion 

All the colours in the stars on the front of the cushion are inspired by the colours in this Anna Maria Horner fabric (Clippings in Passion from the Loulouthi collection, for the curious).  Of course, I had to use it on the back and for the binding as well.

Modern She Made pincushion 

For the small item, I made a pincushion in coordinating fabrics (because who ever has too many pincushions?). The front of the pincushion features my very first attempt at hand quilting.  It is by no means perfect, but I really enjoyed doing it and I think it adds a nice handmade touch.  Now I just need to try it properly on a quilt.

Modern She Made pincushion 

Of course, I just so happened to have some leftover squares of fabric from the large cushion to make a back for the pincushion.

Modern She Made pincushion - back

I've really enjoyed making for this swap - the stars theme was right up my alley, my partner's tastes seem to match well with my own, and, most important, my partner was communicative so I got feedback on my project.  It's amazing what a difference that makes - it's so great to be able to send these items off with confidence that my partner will like them!

There are lots of amazing projects in the flickr pool so I can't wait to see what turns up in my letterbox in a couple of weeks!

This is also one of my second quarter goals for the 2013 Finish Along with Leanne of she can quilt - 3 down, 4 to go!

she can quilt

Linking up with Finish it Up Friday at Crazy Mom Quilts, and TGIFF.

Wednesday 24 April 2013

WIP Wednesday

Just a quick WIP Wednesday update this week.  I just finished up this fun block for Sally - I think all the blocks together are going to make an amazing quilt!

Corners Block for Simply Solids Bee

After some solid sewing last weekend, my Oakshott and low volume plus quilt top is finished!  This is a photo of all the blocks laid out on my design wall before I assembled the quilt top.  I'm hoping to get proper photos tomorrow, weather permitting.

Oakshott and low volume quilt progress

I also whipped up this little (approx 27" square) baby quilt top from scraps.  The picture is really not doing it justice - the colours are much softer in real life.  It's on my design wall at the moment, but I think it needs something... in fact, I think it needs appliqué!  Hmmm - good thing I seem to be in the mood to try new things at the moment.

Baby quilt top made from scraps this morning

What have you been working on this week?

Linking up with Lee at Freshly Pieced:

WIP Wednesday at Freshly Pieced

Monday 22 April 2013

An improv cushion for Gran

Do you know what you get from paper piecing?  Scraps.  Lots and lots of scraps.  Last weekend I decided to crack open my full to bursting box of Noteworthy scraps and have a play around.  Once I started pulling scraps out, I knew I wanted to make something for my grandmother Heather (Gran to me).

This is basically improv piecing - I just started with a piece of fabric and kept adding bits, trimming it down to a regular shape as necessary, until I had a decent sized block.  You might be able to see that there are a couple of more deliberately pieced areas (the pink at the top and the bottom of the pillow), where I wanted to include some pink but all my scraps were too small to be able to add a single piece. This 16" square pillow is made up of four improv pieced blocks, stitched together and then trimmed down to square.

Improv cushion for Gran 

I wanted the quilting to contrast with the crazy and wonky piecing, so I quilted a reasonably dense cross-hatch grid (I marked at 1" intervals down each side of the quilt top and used a hera marker to mark each diagonal line before quilting).  The 50 weight cream cotton thread I used just melts into the fabrics, so that the texture is the main feature.

Improv cushion for Gran

Both the backing and the binding are from the same fabric collection - I was able to use a single fat quarter for the backing, with a simple envelope style pillow closure.  I think I might need to get more of this bird on a wire print - it makes a really great binding.

This pillow will be in the mail to Gran this week - she lives in Auckland, otherwise I would deliver it personally.  Hopefully she likes it!

Linking up with:

Plum and June Better Off Thread Fresh Poppy Design

and finish it up friday with crazy mom quilts.

Saturday 20 April 2013

Saturday Cat Words of Wisdom #15

This week's photo and words come from Joy at Daisy Row.  Her sweet cat Cassie is showing the classic cat trait of curiosity!

"Make sure you keep an eye on what the neighbours are up to." Cassie

Does your pet have something to say? If you would like to see your pet on a future Saturday Cat Words of Wisdom post, send me an email (adrianneonthewindyside at gmail dot com) with the photo you would like featured, some words (wise, witty, or just plain silly) that relate to the photo, your pet's name, and a link to your blog/flickr stream/website.

Friday 19 April 2013

Teeny tiny baby quilts

My wee little baby quilts for the neonatal ward of a local hospital are finished!

Quilts for neonatal unit

I made these two 16" by 20" quilts from squares of 1930's reproduction prints donated by a guild member who generously went through her stash and provided lots of fabric kits.

Quilts for neonatal unit

I split my kit into two lots, and added my own fabrics - navy pin-dot for one, and a grey and white tile print for the other.  It was particularly satisfying to be able use backing and binding left over from other quilts.

Orange blossom quilting

The quilt with the navy fabric received very simple cross-hatch quilting.  With the other one, I tried an experiment, using Elizabeth Hartman's Orange Peel Quilting tutorial.  I really enjoyed doing the orange peel quilting, and I'm very happy with how it turned out - it's definitely a design I will be doing again!

Quilts for neonatal unit

This is a typical quilt photo scenario for me!  Fortunately this little quilt didn't get far, but I can tell the autumnal weather will have its challenges!

It was very enjoyable to make these little quilts knowing they will go to a good cause - they didn't take much time at all, and I was able to use up a few of the extra bits and pieces that I always save and rarely find a use for.  

I have been tempted from time to time to join one of the international groups that quilts for charity (like do. Good Stitches), but it seems really inefficient to be sending stuff like this overseas.  Now that I know what size quilts the local hospitals need (these quilts are for Hutt Hospital, Wellington Hospital prefers quilts that are around 27" - 28" square), I plan to make more - they are a great size for experimenting and using up scraps!

If you make quilts for charitable causes, do you prefer to stick to local causes, or does the sense of community from being part of a charitable bee make sending quilts and blocks further afield worthwhile for you?

These two quilts are the first two finishes off my second quarter goals list - yay!

she can quilt

Linking up to finish it up friday with crazy mom quilts.

Wednesday 17 April 2013

WIP Wednesday

This week, I've been growing my Oakshott and low volume plus quilt from this...

Oakshott and low volume plus quilt 

to this.  I'm planning a quilt which will be 7 blocks by 7 blocks (80" square), so I'm just over halfway there in terms of making blocks.  I'm really enjoying all the variety in the background squares (from the low volume charm swap hosted by Lori), but the background is looking a little too busy for me at this stage, so I plan to add in some even quieter fabrics in the next 24 blocks.

Oakshott and low volume plus quilt

I've also been working on my item for the Modern She Made Swap.  This is the large item - I've quilted it up and turned it into a cushion for my partner (I think I can say that without giving the game away!).


I am so happy with how the piecing turned out I think I will have to make another version for myself!  

I've also been working on the small item - this is the beginnings of a pincushion - with my first attempt at hand quilting.  I used perle 8 cotton and it was a bit of a learning curve (for example, I used a thimble, which I have never done before).  I probably should have watched this fantastic Sarah Fielke video before I started, rather than once I finished, but never mind, the hand quilting has a mainly decorative function here.  Apologies for the crappy instagram photo! 


What are you working on this week?

Linking up with Lee at Freshly Pieced:

WIP Wednesday at Freshly Pieced

Monday 15 April 2013

Fabric experimentation

Have you seen the amazing things that Rossie does with fabric, dye and bleach?  Like this, and this and this.  All these posts made me start thinking about doing a bit of my own fabric manipulation.  I was put off by my lack of knowledge about how to actually go about dyeing or bleaching fabric (and the thought that to do it properly, I would need to make a big mess and invest in several products to properly set the dye or stop the bleach).

Then, I read this post by Sarah aka Narcoleptic in a Cupboard, which linked to this post about bleaching fabric by Elizabeth Hartman at Oh, Fransson!.  Well, that seemed like something I could do.

I had a fat quarter bundle of Indie from Art Gallery Fabrics that I have been wanting to use now that the weather is getting colder - the colours feel very autumnal to me.  I cut each fat quarter into two fat eighths, so that I had two fat eighth bundles.

Fabric experimentation

For bleaching, I mixed 6 litres of cold water with 750ml of household bleach (21.5 grams per litre sodium hydrochloride) in a plastic bucket.  I then added one of the fat eighth bundles, making sure the pieces of fabric weren't all clumped together, and stirred it around to make sure all of the fabric were completely saturated and under the liquid as much as possible.

I watched and stirred the mixture for about 15 minutes before taking out some of the lighter coloured fabrics like the yellows, oranges and light pinks.  At that stage I rinsed them by placing them in a separate container under cold running water.  I left the other, darker fabrics in the bleach mixture for about another 5 minutes before taking them out and rinsing under cold water as well.  I then threw the whole lot, together with the unbleached fat eighth bundle, into the washing machine and ran it through a normal cycle (I have a front loader which I suspect reduces fraying quite a bit - if you have a top loader with an agitator you might want to pink the edges of fabric before pre-washing to reduce fraying).

Fabric experimentation

In this photo, and the one above, the bleached fabrics are on the right and the unbleached fabrics are on the left.  I really love how the fabrics turned out - maybe because the colours were so rich to begin with, rather than looking washed out, the bleached fabrics are really bright and vibrant, almost fluorescent in some cases.

Fabric experimentation

I was going to try and take photos of all the fabric pairs, but the wind picked up and I was in danger of having all my lovely fabric blow away.  I think you can get the idea from this picture though - here the unbleached fabrics are on top and the bleached fabrics are below.  In the material I read about bleaching, people seemed to say that blue fabrics hold their colour well, and that was certainly my experience.  The dark blue fabric above definitely held its colour the best out of all the fabrics in this collection.

I'm really excited to use these fabrics in a project - I am going to keep the fabric pairs together for what I am hoping will be quite interesting results!

Have you ever tried bleaching or dyeing fabrics?  Any tips for the next time I get the urge to go crazy and alter some fabric?

Sunday 14 April 2013

Modernista Homemade happiness

Since sending off my Modernista Homemade swap items, I had sort of forgotten that I would be receiving items in return, so it was a total surprise when my goodies arrived in the mail this week.

I really really love the things my partner (Bianca aka binkiege) made for me.  First up, this lovely (and, at 24" square, huge!) pillow cover.  I love all the fabrics used, and I don't have any of them in my stash, which makes this extra special.

Modernista Homemade cushion

The extra item is this super cute pincushion which you put over the arm of the sofa when you are stitching on the couch (here being modelled by my fence).  Aren't those owls sweet?

Modernista Homemade pincushion

These items co-ordinate beautifully, but aren't completely matchy-matchy.  Bianca was very kind and thoughtfully included a few extra goodies, like sweet little flower-headed pins, little sewing themed charms, cute ribbon and colour-catchers for the first time I wash the pillow cover.

Modernista Homemade cushion and pincushion

Finally, I have to show you how well this pillow goes with the quilt on my bed.  This is either a total coincidence, or some high quality stalking was involved!  Since it goes so well (and Ivy approves, as you can tell by her photo-bombing antics), it will live on my bed, and has already proved to be very comfortable to lean on. 

Modernista Homemade happiness

I often write my blog posts from bed at the end of the day, so I am already thinking of this as my blogging pillow - it seems an appropriate name, especially since it came to me through an online swap.

Thank you again Bianca, for the obvious time, effort and care you put into these items, and making this swap such a great experience!

Saturday 13 April 2013

Saturday Cat Words of Wisdom #14

This week's gorgeous photo comes from the lovely Linda from lawson place.  Aren't her dogs Pip (with the bone) and Logi (wishing he had the bone) so sweet?  They look like they're the best of friends, even if they don't always get on.

logi and pip 323
"Size isn't everything" Pip

Does your pet have something to say? If you would like to see your pet on a future Saturday Cat Words of Wisdom post, send me an email (adrianneonthewindyside at gmail dot com) with the photo you would like featured, some words (wise, witty, or just plain silly) that relate to the photo, your pet's name, and a link to your blog/flickr stream/website.

Tuesday 9 April 2013

Finish Along Second Quarter Goals

she can quilt

Now is the time to set my goals for the second quarter of 2013.  I had a pretty good first quarter, so I shouldn't have too many WIPs to finish this round, right?

1. Giant Star Quilt.  I have made some progress on this, but it's just not quite finished.


2. Pistols at Dawn Quilt.  I took this very impromptu layout photo after I had received quite a few of the blocks from the lovely Fallow Group ladies.  Now that I have received all but one of the blocks from the group (and I know that last one is on its way) I have four final blocks to make myself, then I can assemble the quilt top and quilt this up.  I even have a backing fabric picked already!

Simply Solids Quilt Progress

3. & 4.  Two teeny tiny baby quilts for the neonatal unit.  I quilted these over the weekend, so I only need to stitch down the binding (which won't take long on quilts as small as these).


5.  Oakshott and low volume plus quilt.  I have made nine (out of a planned 49) of these blocks now, and I am enjoying taking my time with them.  I feel like 3 months should be enough time to finish this quilt, but since I'm enjoying the process, I'm not going to rush through it.


6. Modern She Made Swap item - I've made the patchwork for the main item for my partner, which will be either a pillow or a mini quilt.  I am really happy with how this has turned out so far!


7. A Letter from Lotta Quilt.  This wee quilt needs basting and quilting - any suggestions for the quilting design?


Not too many WIPs?  Yeah, right!  And I have plans for several more projects, plus I was delighted to find out that a couple of my friends will be needing baby quilts soon (I'm really pleased and excited for them!).

Are you participating in the Finish-Along for the second quarter of the year?  You can join for any quarter, so if you didn't participate in the first quarter, but want to play along, now is the perfect time.  You can link your second quarter goal lists until the 15th of April.